Android怎么用preference写一个switch开关,让软件开机自启
Android怎么用preference写一个switch开关,让软件开机自启
要让应用程序开机自启动,您需要使用Android的“BroadcastReceiver”和“Service”来实现。Preference则是用于用户可以手动启用或禁用自启动功能的设置选项。下面是一个示例,演示如何使用Preference实现开机自启动的功能:
1、在您的应用程序的“res/xml”文件夹下创建一个新的preference文件,例如“preferences.xml”。添加一个SwitchPreference:
<SwitchPreference
    android:key="auto_start"
    android:title="开机自启动"
    android:defaultValue="false"/>
2、在您的应用程序中的“AndroidManifest.xml”文件中添加以下权限;
<uses-permission android:name="android.permission.RECEIVE_BOOT_COMPLETED"/>
3、创建一个名为“BootReceiver”的BroadcastReceiver类,并在其onReceive方法中启动您的Service类。如果用户已经启用了自启动,则自启动服务将在启动后启动。否则,服务将在用户启用自启动后启动。确保在BroadcastReceiver中添加以下代码:
public class BootReceiver extends BroadcastReceiver {
    @Override
    public void onReceive(Context context, Intent intent) {
        if (intent.getAction().equals(Intent.ACTION_BOOT_COMPLETED)) {
            SharedPreferences sharedPreferences = PreferenceManager.getDefaultSharedPreferences(context);
            boolean autoStart = sharedPreferences.getBoolean("auto_start", false);
            if (autoStart) {
                Intent serviceIntent = new Intent(context, YourServiceClass.class);
                context.startService(serviceIntent);
            }
        }
    }
}
4、在您的应用程序中创建一个名为“YourServiceClass”的服务类,实现应用程序的功能。
public class YourServiceClass extends Service {
    @Override
    public IBinder onBind(Intent intent) {
        return null;
    }

    @Override
    public void onCreate() {
        // 初始化您的服务
    }

    @Override
    public int onStartCommand(Intent intent, int flags, int startId) {
        // 执行您的服务操作
        return START_STICKY;
    }

    @Override
    public void onDestroy() {
        // 清理资源
    }
}
5、注册BroadcastReceiver和Service类。在您的应用程序中的“AndroidManifest.xml”文件中添加以下代码:
<application
    android:icon="@drawable/ic_launcher"
    android:label="@string/app_name">
    <activity
        android:name=".MainActivity"
        android:label="@string/app_name">
        <intent-filter>
            <action android:name="android.intent.action.MAIN"/>
            <category android:name="android.intent.category.LAUNCHER"/>
        </intent-filter>
    </activity>
    <service android:name=".YourServiceClass"/>
    <receiver android:name=".BootReceiver">
        <intent-filter>
            <action android:name="android.intent.action.BOOT_COMPLETED"/>
        </intent-filter>
    </receiver>
</application>
现在,当用户启用了“开机自启动”选项时,您的应用程序将在设备启动后自动启动您的服务。有用的话,给个关注,手抽筋了................................
不知道你这个问题是否已经解决, 如果还没有解决的话:- 请看👉 :Android基础控件Switch的使用
- 除此之外, 这篇博客: Android Preference 卡片圆角风格定制中的 实现步骤 部分也许能够解决你的问题, 你可以仔细阅读以下内容或者直接跳转源博客中阅读:
在网上查找这块的资料,发现并未找到相关的,大多都是通过修改 Preference style 来设置背景色什么的,和我们预想的
效果不太一样,那就去看看 Preference 源码吧,说不定能有什么收获。
先看下 Preference 类继承关系结构图,在AS中通过快捷键 ctrl + h 即可调出视图
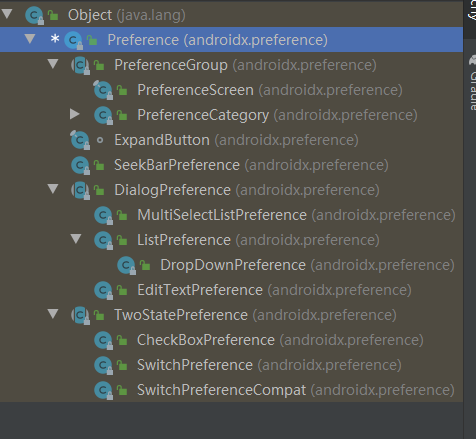
基本上我们常用的简单显示控件都继承自 Preference,系统设置界面也不例外,全都是用的 Preference
通过分析 Preference 源码发现了默认布局文件为 preference.xml,文件路径位于
frameworks/base/core/res/res/layout/preference.xml
<?xml version="1.0" encoding="utf-8"?>
<!-- Layout for a Preference in a PreferenceActivity. The
     Preference is able to place a specific widget for its particular
     type in the "widget_frame" layout. -->
<LinearLayout xmlns:android="http://schemas.android.com/apk/res/android"
    android:layout_width="match_parent"
    android:layout_height="wrap_content"
    android:minHeight="?android:attr/listPreferredItemHeight"
    android:gravity="center_vertical"
    android:paddingEnd="?android:attr/scrollbarSize"
    android:background="?android:attr/selectableItemBackground" >

    <ImageView
        android:id="@+android:id/icon"
        android:layout_width="wrap_content"
        android:layout_height="wrap_content"
        android:layout_gravity="center"
        />

    <RelativeLayout
        android:layout_width="wrap_content"
        android:layout_height="wrap_content"
        android:layout_marginStart="15dip"
        android:layout_marginEnd="6dip"
        android:layout_marginTop="6dip"
        android:layout_marginBottom="6dip"
        android:layout_weight="1">

        <TextView android:id="@+android:id/title"
            android:layout_width="wrap_content"
            android:layout_height="wrap_content"
            android:singleLine="true"
            android:textAppearance="?android:attr/textAppearanceLarge"
            android:ellipsize="marquee"
            android:fadingEdge="horizontal" />

        <TextView android:id="@+android:id/summary"
            android:layout_width="wrap_content"
            android:layout_height="wrap_content"
            android:layout_below="@android:id/title"
            android:layout_alignStart="@android:id/title"
            android:textAppearance="?android:attr/textAppearanceSmall"
            android:textColor="?android:attr/textColorSecondary"
            android:maxLines="4" />

    </RelativeLayout>

    <!-- Preference should place its actual preference widget here. -->
    <LinearLayout android:id="@+android:id/widget_frame"
        android:layout_width="wrap_content"
        android:layout_height="match_parent"
        android:gravity="center_vertical"
        android:orientation="vertical" />

</LinearLayout>
可以看到对应 Preference 基本属性 icon、title、summary,最外层布局为 LinearLayout,我们是不是可以通过修改
LinearLayout 的 background 属性来实现我们想要的效果呢?答案是可以的,巧的是 Preference 中提供了修改 layoutid 方法
public void setLayoutResource(int layoutResId) {
        mLayoutResId = layoutResId;
    }
google 已经贴心的给我们预留了定制接口,
在 xml 中使用 android:layout="@layout/card_preference"
在 java 中使用 mPreference.setLayoutResource(R.layout.card_preference)
这样我们就不用去修改 preference.xml 源码,copy preference.xml 保证里面的 id 对应即可,其它的随你定义。
接下来就让我们来实现上图的效果吧
如果你已经解决了该问题, 非常希望你能够分享一下解决方案, 写成博客, 将相关链接放在评论区, 以帮助更多的人 ^-^