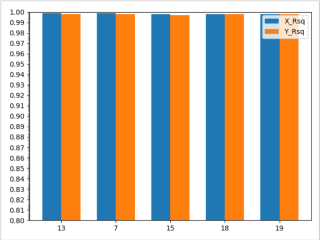
显示和理想的差距。。For循环逻辑上哪里出错了吗?
import pandas as pd
# noinspection PyUnresolvedReferences
import numpy as np
import os
# noinspection PyUnresolvedReferences
import matplotlib.pyplot as plt
# noinspection PyUnresolvedReferences
from sklearn.linear_model import LinearRegression
#input the excel file address and the data to be plotted.
#refer to the excel header for groupKey, LocXKey, LocYKey, valueXKey and valueKKey.
fileAdd_x = r"C:\Users\z\PycharmProjects\Test\Excel\Material\X.Meas.csv"
fileAdd_y = r"C:\Users\z\PycharmProjects\Test\Excel\Material\Y.Meas.csv"
groupKey = 'WorkSet'
#data import
data_x = pd.read_csv(fileAdd_x).dropna( how = 'all' )
data_y = pd.read_csv(fileAdd_y).dropna( how = 'all' )
groups_x = data_x[ groupKey ].unique()
groups_y = data_y[ groupKey ].unique()
##################################################################################################
S=[13,7,15,18,19]
labels = S
x = np.arange(len(labels)) # the label locations
width = 0.35 # the width of the bars
######### Correlation #########
fig_Correlation,ax = plt.subplots()
for group in groups_x:
groupIndex = data_x[ groupKey ] == group
groupData_x = data_x[ groupIndex ]
x1 = groupData_x['X_Meas']
y1 = groupData_x['X']
#print(x1)
# 将 x,y 分别增加一个轴,以满足 sklearn 中回归模型认可的数据
x1 = x1[:, np.newaxis]
y1 = y1[:, np.newaxis]
model = LinearRegression() # 构建线性模型
model.fit(x1, y1) # Overlayx自变量在前,因变量在后
R2_X = model.score(x1, y1) # 拟合程度 x R2
print('R2_x = %.3f' % R2_X) # 输出 R2
rects5 = ax.bar(x - width/2, R2_X , width, label='X_Rsq')
for group in groups_y:
groupIndex = data_y[ groupKey ] == group
groupData_y = data_y[ groupIndex ]
x2 = groupData_y['Y_Meas']
y2 = groupData_y['Y']
# 将 x,y 分别增加一个轴,以满足 sklearn 中回归模型认可的数据
x2 = x2[:, np.newaxis]
y2 = y2[:, np.newaxis]
model = LinearRegression() # 构建线性模型
model.fit(x2, y2) # Overlayx自变量在前,因变量在后
R2_Y = model.score(x2, y2) # 拟合程度 y R2
print('R2_y = %.3f' % R2_Y) # 输出 R2
rects6 = ax.bar(x + width/2, R2_Y , width, label='Y_Rsq')
######### Graph Correlation #########
# Add some text for labels, title and custom x-axis tick labels, etc.
ax.set_xticks(x)
ax.set_xticklabels(labels)
ax.set_ylim((0,1.3)) #定义y轴的取值范围
ax.legend()
def autolabel(rects):
# attach some text labels
for rect in rects:
height = rect.get_height()
ax.text(rect.get_x()+rect.get_width()/2.0, 1.0*height,
'%.3f'%float(height), ha='center', va='bottom')
#‘%.2f’%float(height)这个设置是让显示的数值精度为小数点后两位小数
autolabel(rects5)
autolabel(rects6)
fig_Correlation.tight_layout()
#plt.savefig('./RMSE.jpg') #把图片保存在当前路径下,必须放在plt.show()之前,否则将是空白
plt.show()**实际

**
想法

主要在俩个问题:绘图的时候传参数值不对;刻度太大,值差别太小,所以看不出来。

import matplotlib.pyplot as plt
import numpy as np
from matplotlib import ticker

S = [13, 7, 15, 18, 19]
labels = S
x = np.arange(len(labels))  # the label locations
width = 0.35  # the width of the bars

fig_Correlation, ax = plt.subplots()
zsx = [0.999, 0.999, 0.998, 0.998, 0.998]
zsy = [0.998, 0.998, 0.997, 0.998, 0.998]
ax.bar(x - width / 2, zsx, width, label='X_Rsq')
ax.bar(x + width / 2, zsy, width, label='Y_Rsq')
ax.set_xticks(x)
ax.set_xticklabels(labels)
ax.set_ylim((0.8, 1.0))  # 定义y轴的取值范围
ax.yaxis.set_major_locator(ticker.MultipleLocator(0.01)) # y轴刻度
ax.yaxis.set_minor_locator(ticker.MultipleLocator(0.001))  # y最小刻度精度
ax.legend()
plt.show()
图贴在代码块里面了,没贴出来