在windows怎么编译libtorrent
编译libtorrent时有很多错误,编译不了。有没有编译好的libtorrent或者告诉我详细的编译步骤。谢谢。
我看到了一篇博客,讲得特别好,希望对你有所帮助
博文网址:https://blog.csdn.net/z345436330/article/details/89068299
- 看下这篇博客,也许你就懂了,链接:windows上编译,使用libtorrent
- 除此之外, 这篇博客: [libtorrent] windows搭建 libtorrent 开发环境中的 搭建 libtorrent 步骤: 部分也许能够解决你的问题, 你可以仔细阅读以下内容或者直接跳转源博客中阅读:
一. 安装 vcpkg 和 boost
1. 安装 vcpkg 到本地
https://github.com/microsoft/vcpkg
git clone2. 执行 bootstrap-vcpkg.bat 脚本
.\vcpkg\bootstrap-vcpkg.bat3. 添加vcpkg环境变量
环境变量->PTAH->添加 vcpkg 的目录,如下图:

4. 安装 boost
.\vcpkg.exe install boost:x86-windows
(注:此处注意,安装需要一些时间,注意可能会因为缺少 VS英文包 报错)5. 安装 OpenSSL
(如果本地没有安装 SSL,那么需要进行此步骤)
传送门:http://slproweb.com/products/Win32OpenSSL.html (下载 32位 版本)
安装成功后,配置环境变量:
环境变量->PTAH->添加 vcpkg 的目录,如下图:

二. 编译 libtorrent
1. 下载 libtorrent 源码
git clone https://github.com/arvidn/libtorrent.git2. git init
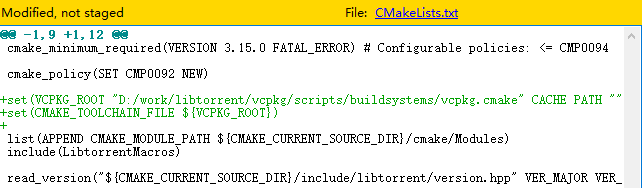
git submodule update --init3. 修改 CMakeLists.txt
添加下边两行到 CMakeLists.txt 中set(VCPKG_ROOT "D:/work/libtorrent/vcpkg/scripts/buildsystems/vcpkg.cmake" CACHE PATH "") set(CMAKE_TOOLCHAIN_FILE ${VCPKG_ROOT})位置如图所示:
三. 通过 cmake-gui 生成 vs 项目
1. 下载安装 cmake-gui
传送门:Download | CMake

2. 配置 libcorrent
打开 cmake-gui ,设置源码路径和生成路径

点击 configure 后,选 win32 , 自动生成配置,如下图所示

配置生成成功后,勾选 build_tests 和 build_examples, 点击 Generate,生成配置文件;如下图所示

四. 编译 libtorrent
1. 打开VS2019 ,加载 .\libtorrent\build\ 路径下的 libtorrent.sln, 如下图所示:

2. 右键 ALL_BUILD ,全部编译,如下图所示:

大功告成。
- 以下回答来自chatgpt:
对于在Windows操作系统上编译libtorrent的问题,我可以提供以下解决方案:
在Windows上编译libtorrent的步骤如下: 1. 安装Visual Studio: - 从官方网站https://visualstudio.microsoft.com/downloads/ 下载并安装最新的Visual Studio(建议使用Community版本)。 - 安装期间选择安装C++开发工作负载。
- 安装Boost库:
- 从https://www.boost.org/users/download/ 下载最新的Boost库源码。
- 解压下载的源码到任意目录。
- 打开命令提示符(cmd)并切换到解压后的Boost源码目录。
- 运行以下命令编译Boost库:
bootstrap.bat b2.exe -j{n} address-model={x-bit} architecture=x86 stage其中,{n}是你的计算机上可用的CPU核心数,{x-bit}是你的操作系统是32位还是64位。 编译完成后,Boost库的头文件和库文件将被生成到stage目录中。
克隆并编译libtorrent:
- 安装Git工具(如果尚未安装),并从https://github.com/arvidn/libtorrent 克隆libtorrent的源代码仓库。
- 使用Visual Studio打开命令提示符(x86 Native Tools Command Prompt)。
- 切换到克隆后的libtorrent源代码目录。
运行以下命令编译libtorrent:
bjam.exe release boost="D:\boost" boost-link=static其中,"D:\boost"是Boost库的源码路径。使用编译后的libtorrent库:
- 编译完成后,libtorrent的库文件将被生成到lib目录中。
- 在你的项目中,将libtorrent的头文件路径添加到编译器的包含目录中。
- 将libtorrent的库文件路径添加到连接器的库目录中。
- 将libtorrent的库文件名添加到连接器的附加依赖项中。
- 现在,你可以在你的项目中引用和使用libtorrent了。
对于已编译好的可用版本的libtorrent,我很抱歉我无法为您提供。尽管已编译好的版本可能存在,但它们可能不适用于您的特定环境或项目要求。建议按照以上步骤自行编译libtorrent以确保最好的兼容性。
希望这个解决方案对您有帮助。如有任何问题,请随时追问。
如果你已经解决了该问题, 非常希望你能够分享一下解决方案, 写成博客, 将相关链接放在评论区, 以帮助更多的人 ^-^