请教一个关于异常UT000128异常的问题
我现在遇到一个问题,服务一直不停地报这个错误,请问一下这个是因为客户端的问题吗?

在响应可读之前远端关闭了链接,可以参考下 这个博客 https://blog.csdn.net/qq_18671803/article/details/118721469
调整下服务相关超时时间看看
UT000128异常通常是由Java应用程序中的线程死锁引起的。线程死锁是指两个或多个线程互相等待对方释放锁的情况,从而导致所有线程无法继续执行,形成死锁。当死锁发生时,Java虚拟机可能会抛出UT000128异常。
要解决UT000128异常,需要识别并解决线程死锁。以下是一些可能的解决方案:
检查代码中的同步块:线程死锁通常是由于同步块的滥用或同步块嵌套引起的。因此,您可以检查代码中的同步块,并尝试简化同步块的使用或减少同步块的嵌套。
检查线程间通信方式:线程死锁通常是由于线程间通信方式不当引起的,例如使用wait()和notify()方法时没有正确处理信号量或条件变量等。因此,您可以检查线程间通信方式,并尝试使用更可靠的方法进行线程间通信。
检查锁的使用方式:线程死锁通常是由于锁的使用方式不当引起的,例如锁级别过高或锁的范围过大等。因此,您可以检查锁的使用方式,并尝试使用更合适的锁机制,例如读写锁或乐观锁等。
使用工具进行检测和分析:您可以使用一些工具,如Java线程分析工具、Java内存分析工具等,来检测和分析线程死锁的情况,并找出导致死锁的根本原因。
回答整理自chatgpt,如果能解决麻烦采纳一些,谢谢啦
在application.properties或 application.yml中配置server.connection-timeout属性来设置连接超时时间,把时间搞长一点试试,这原因有多种,需要多少,比较对你的项目不是很了解
不知道你这个问题是否已经解决, 如果还没有解决的话:- 你可以看下这个问题的回答https://ask.csdn.net/questions/7636620
- 你也可以参考下这篇文章:14 实战一模拟一个简单的贷款准入审批(明确业务需求、编写对应逻辑)
- 除此之外, 这篇博客: 微服务架构实战第十节 微服务的模拟组件测试和契约服务测试中的 如何开展消费者驱动契约测试? 部分也许能够解决你的问题, 你可以仔细阅读以下内容或者直接跳转源博客中阅读:
通过前面内容的介绍,我们实际上明确了消费者驱动契约测试是一个比较复杂的过程,所以不推荐对所有的服务交互过程都实施这种测试方法。在本课程中,我们梳理了如下所示的消费者驱动契约测试实施过程:
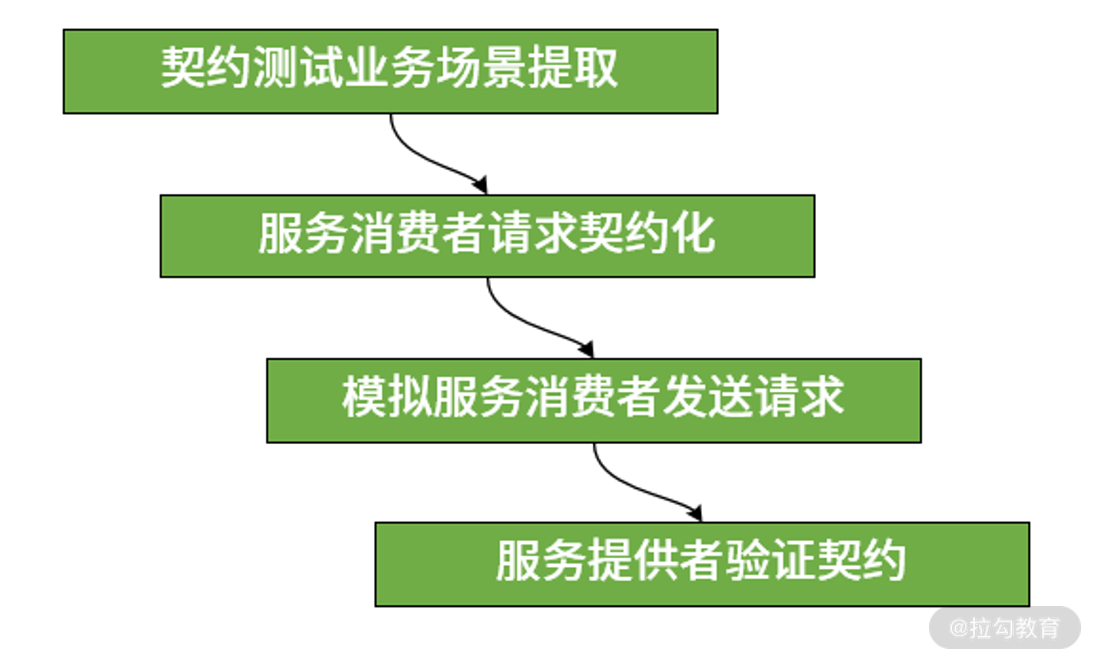
消费者驱动契约测试实施步骤
正如前面提到的,并不是所有的业务场景都需要使用消费者驱动契约测试,往往越容易发生变更的业务场景就越需要进行测试,所以上图中的第一个步骤是根据业务需求选择合适的测试场景。一旦明确了场景之后,基于消费者驱动的设计思想,就可以将消费者请求契约化。消费者发送的请求、提供者返回的响应都需要明确记录,并整理成该场景下的契约。然后,测试用例将模型消费者,向真实的服务提供者发送请求。最后,通过获取请求结果,验证提供者的契约是否已经发生变化。
为了实施上述步骤,我们需要选择消费者驱动契约测试工具。作为一个完整的微服务套件,Spring Cloud 也提供了 Spring Cloud Contract 作为消费者驱动契约测试的开发框架。在本课程中,我们将以 Spring Cloud Contract 为例对消费者驱动契约测试工具的使用方式做详细介绍。
测试是一套独立的技术体系,需要开发人员充分重视并付诸实践,这点对于微服务架构而言更是如此。在本课程中,我们无意对测试工作面面俱到,而是重点关注于如何确保单个服务的正确性以及如何确保多个服务之间交互的正确性,因此分别提出了组件级别和服务级别的测试方法。在微服务架构中,对于后者而言,还需要引入专门的消费者驱动契约测试体系。
这里给你留一道思考题:消费者驱动的契约测试解决的核心问题是什么?
在介绍完设计理念之后,下一课时我们将先来讨论第一种测试体系,即验证组件级别正确性的测试方法和工程实践。
在上一课时中,我们全面介绍了针对微服务架构的测试方案。我们提出在测试微服务架构中需要直接面对的两个核心问题,即如何验证组件级别的正确性以及如何验证服务级别的正确性。本课时和下一课时的内容将分别围绕这两个核心问题进行展开,今天让我们先来看一下组件级别的测试方法和工程实践。
在上一课时中,我们已经讨论到使用 Mock 来对组件进行测试。Mock 是一种策略而不是技术,今天我们就需要给出如何实现 Mock 的技术体系。假设在 intervention-service 中存在这样一个 InterventionService 类,其中包含一个 getInterventionById 方法,如下所示:
@Service
public class InterventionService {
public Intervention getInterventionById(Long id) {
…
}
}那么,如何对这个方法进行 Mock 呢?通常,我们可以使用 easymock、jmockMock 等工具包来隐式实现这个方法。对于某一个或一些被测试对象所依赖的方法而言,编写 Mock 相对简单,只需要模拟被使用的方法即可。在这个例子中,如果依赖于 InterventionService,我们只需要给出 getInterventionById 方法的实现。
让我们回到单个微服务的内部,涉及组件级别测试的维度有很多,包括数据访问 Repository 层、服务构建 Service 层和提供外部端点的 Controller 层。同时,基于常见的代码组织结构,组件测试也体现为一种层次关系,即我们需要测试从 Repository 层到 Service 层再到 Controller 层的完整业务链路。
另一方面,Spring Boot 也内置了一个测试模块可以用于组件级别的测试场景。在该模块中,提供了一批非常有用的注解来简化测试过程,要想使用这些注解,我们需要引入 spring-boot-starter-test 依赖,如下所示:
<dependency>
      <groupId>org.springframework.boot</groupId>
      <artifactId>spring-boot-starter-test</artifactId>
      <scope>test</scope>
</dependency>
首先,因为 Spring Boot 程序的入口是 Bootstrap 类,Spring Boot 专门提供了一个 @SpringBootTest 注解来测试你的 Bootstrap 类,使用方法如下所示:
@SpringBootTest(classes = UserApplication.class,
	webEnvironment = SpringBootTest.WebEnvironment.MOCK)
在 Spring Boot 中,@SpringBootTest 注解主要用于测试基于自动配置的 ApplicationContext,它允许你来设置测试上下文中的 Servlet 环境。在多数场景下,一个真实的 Servlet 环境对于测试而言过于重量级,所以我们一般通过 WebEnvironment.MOCK 环境来模拟测试环境。
我们知道对于一个 Spring Boot 应用程序而言,Bootstrap 类中的 main() 入口通过 SpringApplication.run() 方法将启动 Spring 容器。如下所示的 intervention-service 中的启动类 InterventionApplication:
@SpringBootApplication
public class InterventionApplication {

    public static void main(String[] args) {
        SpringApplication.run(InterventionApplication.class, args);
    }
}
针对这个 BootStrap 类,我们可以通过编写测试用例的方式来验证 Spring 容器是否能够正常启动,该测试用例如下所示:
package com.tianyalan.testing.orders;

import org.junit.Assert;
import org.junit.Test;
import org.junit.runner.RunWith;
import org.springframework.beans.factory.annotation.Autowired;
import org.springframework.boot.test.context.SpringBootTest;
import org.springframework.context.ApplicationContext;
import org.springframework.test.context.junit4.SpringRunner;

@SpringBootTest
@RunWith(SpringRunner.class)
public class ApplicationContextTests {

  @Autowired
  private ApplicationContext applicationContext;

  @Test
  public void testContextLoaded() throws Throwable {
      Assert.assertNotNull(this.applicationContext);
  }
}
我们看到这里用到了 @SpringBootTest 注解和 @RunWith 注解。前面已经介绍了 @SpringBootTest 注解,而 @RunWith 注解由 JUnit 框架提供,用于设置测试运行器,例如我们可以通过 @RunWith(SpringRunner.class) 让测试运行于 Spring 测试环境中。
同时,我们在 testContextLoads 方法上添加了一个 @Test 注解,该注解来自 JUnit 框架,代表该方法为一个有效的测试用例。这里测试的场景是指对 Spring 中的 ApplicationContext 作了非空验证。执行该测试用例,我们从输出的控制台信息中看到 Spring Boot 应用程序被正常启动,同时测试用例本身也会给出执行成功的提示。
在验证完容器可以正常启动之后,我们继续来看一个 Spring Boot 应用程序的其他组件层。对于 Repository 层而言,主要的交互媒介是数据库,所以 Spring Boot 专门提供了一个 @DataJpaTest 注解来模拟基于 JPA 规范的数据访问过程。同样,对于 Controller 层而言,Spring Boot 也提供了一个 @WebMvcTest 注解来模拟 Web 交互的测试场景。
讲到这里,你可能会奇怪,为什么 Service 层没有专门的测试注解呢?实际上原因也很简单,因为对于 Repository 层和 Controller 层组件而言,它们都涉及与某一种特定技术体系的交互,Repository 层的交互对象是数据库,而 Controller 层的交互对象是 Web 请求,所以需要专门的测试注解。而 Service 层因为主要是业务代码,并没有跟具体某一项技术体系有直接的关联,所以我们在测试过程中只需要充分使用 Mock 机制就可以了。下图展示了一个业务微服务中各层的测试方法:
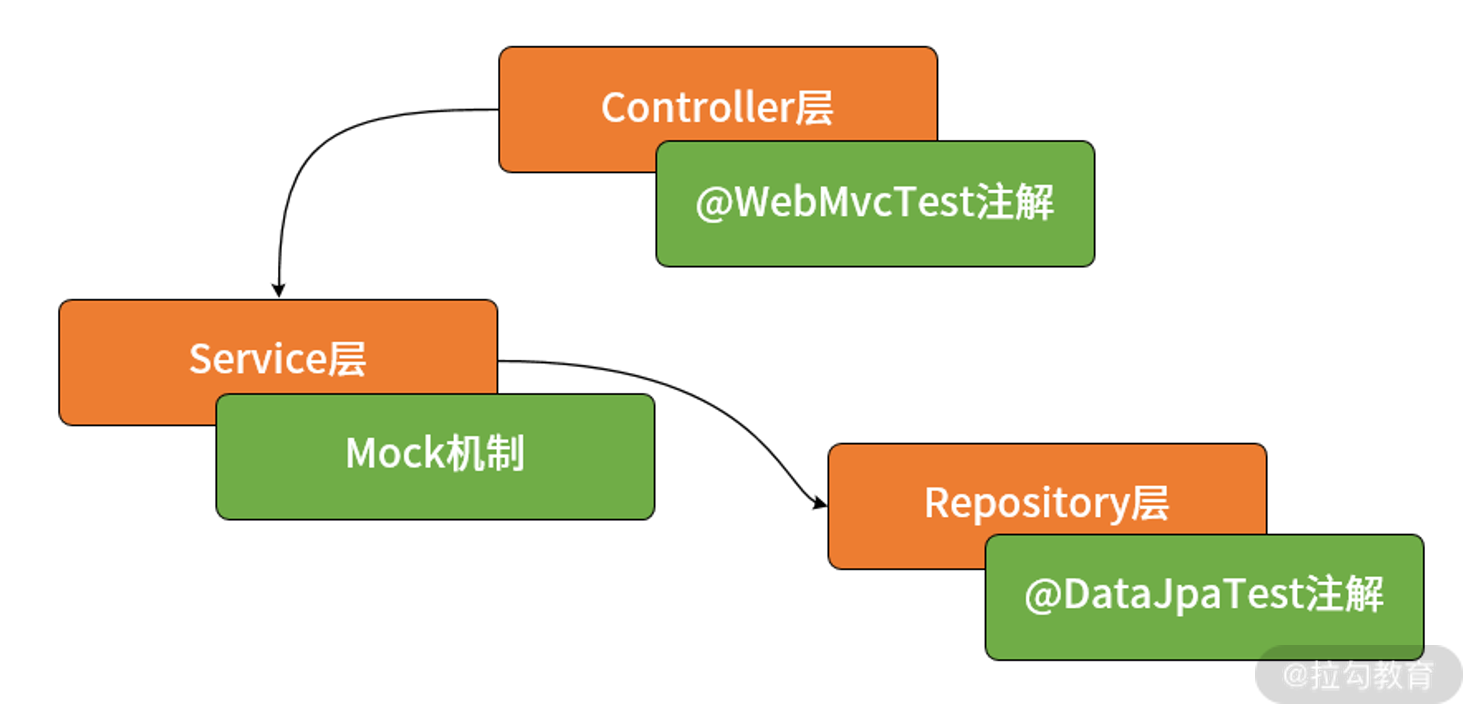
组件测试的层次和实现方式
接下来,我们就将对上图中的三个层次和对应的实现方法分别展开讨论。
对于业务微服务而言,一般都涉及数据持久化,我们将首先从数据持久化的角度出发讨论如何对 Repository 层进行测试,并引入 @DataJpaTest 注解。@DataJpaTest 注解会自动注入各种 Repository 类,并会初始化一个内存数据库及访问该数据库的数据源。为了演示方便,我们使用 h2 作为内存数据库,并通过 Mysql 实现数据持久化,因此需要引入以下 Maven 依赖。
<dependency>
       <groupId>com.h2database</groupId>
       <artifactId>h2</artifactId>
</dependency>

<dependency>
       <groupId>mysql</groupId>
       <artifactId>mysql-connector-java</artifactId>
       <scope>runtime</scope>
</dependency>
让我们回顾 SpringHealth 案例系统中的 intervention-service 中的 InterventionRepository 接口,如下所示:
public interface InterventionRepository extends JpaRepository<Intervention, Long> {

    List<Intervention> findInterventionsByUserId(@Param("userId") String userId);
List<Intervention> findInterventionsByDeviceId(@Param(“deviceId”) String deviceId);
}注意到这里 InterventionRepository 扩展了 Spring Data 中的 JpaRepository 接口。针对该 InterventionRepository 接口的测试用例如下所示:
@RunWith(SpringRunner.class)
@DataJpaTest
public class InterventionRepositoryTest {
@Autowired
private TestEntityManager entityManager;
@Autowired
private InterventionRepository interventionRepository;
@Test
public void testFindInterventionByUserId() throws Exception {
this.entityManager.persist(new Intervention(1L, 1L, 100F, “Intervention1”, new Date()));
this.entityManager.persist(new Intervention(1L, 2L, 200F, “Intervention2”, new Date()));Long userId = 1L;
List<Intervention> interventions = this.interventionRepository.findInterventionsByUserId(userId);
assertThat(interventions).size().isEqualTo(2);
Intervention actual = interventions.get(0);
assertThat(actual.getUserId()).isEqualTo(userId);
}
@Test
public void testFindInterventionByNonExistedUserId() throws Exception {
this.entityManager.persist(new Intervention(1L, 1L, 100F, “Intervention1”, new Date()));
this.entityManager.persist(new Intervention(1L, 2L, 200F, “Intervention2”, new Date()));Long userId = 3L;
List<Intervention> interventions = this.interventionRepository.findInterventionsByUserId(userId);
assertThat(interventions).size().isEqualTo(0);
}
}可以看到这里使用了 @DataJpaTest 以完成 InterventionRepository 的注入。同时,我们还注意到另一个核心测试组件 TestEntityManager,该类内部定义了一个 EntityManagerFactory 变量,而 EntityManagerFactory 能够构建数据持久化操作所需要的 EntityManager 对象。所以,TestEntityManager 的效果相当于不使用真正的 InterventionRepository 来完成数据的持久化,从而提供了一种数据与环境之间的隔离机制。TestEntityManager 中所包含的方法如下所示:
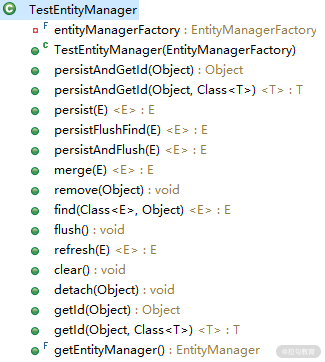
TestEntityManager 中的方法定义列表
基于 InterventionRepository 中的方法定义以及我们初始化的数据,以上测试用例的结果显而易见。你可以尝试执行这些单元测试,并观察控制台的日志输出,从这些日志中可以看出各种 SQL 语句的效果。
前面我们已经介绍了 @SpringBootTest 注解中的 SpringBootTest.WebEnvironment.MOCK选项,该选项用于加载 WebApplicationContext 并提供一个 Mock 的 Servlet 环境,内置的 Servlet 容器并没有真实的启动。现在,我们就针对 Service 层来演示这种测试方式。InterventionService 类的 generateIntervention 方法是其最核心的方法,涉及对 user-service 和 device-service 的远程调用,让我们做一些回顾:
public Intervention generateIntervention(String userName, String deviceCode) {logger.debug(“Generate intervention record with user: {} from device: {}”, userName, deviceCode);
Intervention intervention = new Intervention();
//获取远程 User 信息
UserMapper user = getUser(userName);
if (user == null) {
return intervention;
}
logger.debug(“Get remote user: {} is successful”, userName);//获取远程 Device 信息
DeviceMapper device = getDevice(deviceCode);
if (device == null) {
return intervention;
}
logger.debug(“Get remote device: {} is successful”, deviceCode);
//创建并保存 Intervention 信息
intervention.setUserId(user.getId());
intervention.setDeviceId(device.getId());
intervention.setHealthData(device.getHealthData());
intervention.setIntervention(“InterventionForDemo”);
intervention.setCreateTime(new Date());
interventionRepository.save(intervention);
return intervention;
}请注意以上代码中的 getUser 方法和 getDevice 方法中涉及了远程访问。以 getUser 方法为例,就会基于 UserServiceClient 发送HTTP请求,我们在前面的课程中都已经介绍过这个类,这里也做一下回顾:
@Component
public class UserServiceClient {

    @Autowired
    RestTemplate restTemplate;
public UserMapper getUserByUserName(String userName){
ResponseEntity<UserMapper> restExchange =
restTemplate.exchange(
“http://userservice/users/{userName}”,
HttpMethod.GET,
null, UserMapper.class, userName);UserMapper user = restExchange.getBody();
return user;
}
}对于测试而言,InterventionService 类实际上不需要关注这个 UserServiceClient 中如何实现远程访问的具体过程,因为对于测试过程而言只需要关注方法调用返回的结果。所以,我们对于 UserServiceClient 以及 DeviceServiceClient 同样将采用 Mock 机制完成隔离。针对 InterventionService 的测试用例代码如下所示,可以看到我们采用的是同样的测试方式:
@RunWith(SpringRunner.class)
@SpringBootTest(webEnvironment = SpringBootTest.WebEnvironment.MOCK)
public class InterventionServiceTests {

    @MockBean
    private UserServiceClient userClient;

    @MockBean
    private DeviceServiceClient deviceClient;

    @MockBean
    private InterventionRepository interventionRepository;

    @Autowired
    private InterventionService interventionService;
@Test
public void testGenerateIntervention() throws Exception {
String userName = “springhealth_user1”;
String deviceCode = “device1”;given(this.userClient.getUserByUserName(userName))
.willReturn(new UserMapper(1L, “user1”, userName));
given(this.deviceClient.getDevice(deviceCode))
.willReturn(new DeviceMapper(1L, “便携式血压计”, “device1”, “Sphygmomanometer”, 100F));
Intervention actual = interventionService.generateIntervention(userName, deviceCode);
assertThat(actual.getHealthData()).isEqualTo(100L);
}
}这里同样基于 mockito 对 UserServiceClient 和 DeviceServiceClient 这两个远程访问类的返回结果做了模拟。上述测试用例演示了在 Service 层中进行集成测试的各种手段,这些手段已经能够满足一般场景的需要。
我们再回到 intervention-service 来看看如何对 InterventionController 进行测试。InterventionController 类的功能非常简单,基本都是对 InterventionService 的直接封装,代码如下所示:
@RestController
@RequestMapping(value="interventions")
public class InterventionController {
@Autowired
private InterventionService interventionService;@RequestMapping(value = “/{userName}/{deviceCode}”, method = RequestMethod.POST)
public Intervention generateIntervention( @PathVariable(“userName”) String userName,
@PathVariable(“deviceCode”) String deviceCode) {
Intervention intervention = interventionService.generateIntervention(userName, deviceCode);return intervention;
}@RequestMapping(value = “/{id}”, method = RequestMethod.GET)
public Intervention getIntervention(@PathVariable Long id) {
Intervention intervention = interventionService.getInterventionById(id);return intervention;
}
}在测试 Controller 类之前,我们先介绍一个新的注解 @WebMvcTest,该注解将初始化测试 Controller 所必需的 Spring MVC 基础设施。InterventionController 类的测试用例如下所示:
import org.junit.Test;
import org.junit.runner.RunWith;
import static org.mockito.BDDMockito.given;
import static org.springframework.test.web.servlet.request.MockMvcRequestBuilders.post;
import static org.springframework.test.web.servlet.result.MockMvcResultMatchers.status;

@RunWith(SpringRunner.class)
@WebMvcTest(InterventionController.class)
public class InterventionControllerTests {

    @Autowired
    private MockMvc mvc;

    @MockBean
    private InterventionService interventionService;

    @Test
    public void testGenerateIntervention() throws Exception {
        String userName = "springhealth_user1";
        String deviceCode = "device1";
        Intervention intervention = new Intervention(100L, 1L, 1L, 100F, "Intervention1", new Date());

        given(this.interventionService.generateIntervention(userName, deviceCode))
                .willReturn(intervention);

        this.mvc.perform(post("/interventions/" + userName+ "/" + deviceCode).accept(MediaType.APPLICATION_JSON)).andExpect(status().isOk());
    }
}
以上代码的关键是 MockMvc 工具类,对这个工具类我们有必要展开一下。MockMvc 类提供的一系列基础方法来满足对 Controller 层组件的测试需求。首先,我们首先需要声明发送 HTTP 请求的方式,MockMvc 类中的一组 get/post/put/delete 方法用来初始化一个 HTTP 请求。然后我们可以使用 param 方法来为该请求添加参数。一旦请求构建完成,perform 方法负责执行请求,并自动将请求映射到相应的 Controller 进行处理。执行完请求之后就是验证结果,这时候可以使用 andExpect、andDo 和 andReturn 等方法对返回的数据进行判断来验证 HTTP 请求执行结果是否正确。
执行该测试用例,我们从输出的控制台日志中不难发现整个流程相当于启动了 InterventionController 并执行远程访问,而 InterventionController 中所用到的 InterventionService 则做了 Mock。显然测试 InterventionController 的目的在于验证请求是否成功发送和返回,所以我们通过 perform、accept 和 andExpect 方法最终模拟 HTTP 请求的整个过程并验证结果的正确性。
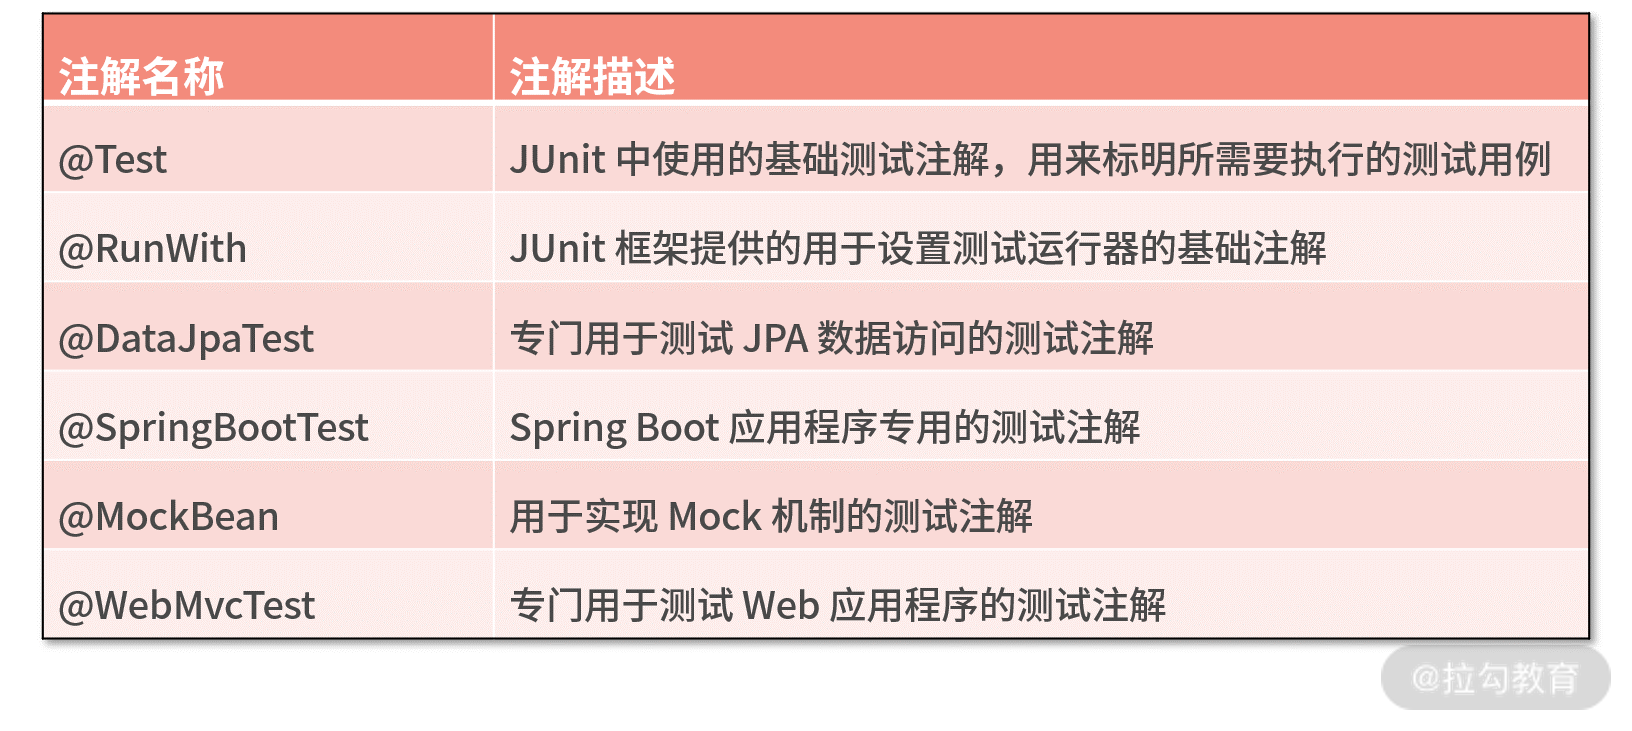
今天的课程讨论了如何对单个微服务中的各个组件进行测试,我们大量使用到了 Spring 框架中的测试注解。作为小结,这里通过一张表格来对这些注解做一个梳理,如下所示:
这里给你留一道思考题:如果我们想要对所依赖的组件的行为进行模拟,可以使用什么方法?
讲完组件级别的测试方法之后,下一课时,我们将关注于基于服务级别测试用例的设计,并将引入 Spring Cloud Contract 框架来实施这一过程。
在上一课时中,我们介绍了组件级别的测试方案和实现方法。组件级别的测试关注于单个微服务的内部,而今天要介绍的面向契约测试则是一种服务级别的测试方法,关注于整个微服务系统中的数据和状态传递过程。Spring Cloud Contract 是 Spring Cloud 中专门用于实现面向契约测试的开发框架,对面向契约的端到端测试过程进行了抽象和提炼,并梳理出一套完整的解决方案。让我们一起来看一下。
在引入 Spring Cloud Contract 之前,我们需要先明确在测试领域中另一个非常重要的概念,即 Stub,也就是打桩。Stub 与 Mock 经常被混淆,因为他们都可以用来替代真实的依赖对象,从而实现对测试对象的隔离效果。然而,Stub 和 Mock 的区别也非常明显,从类的实现方式上看,Stub 必须有一个显式的类实现,这个实现类需要提供被替代对象的所有逻辑,即使是不需要关注的方法也至少要给出空实现。而 Mock 则不同,它只需要实现自己感兴趣的方法即可,这点在上一课时中已经得到了体现。
回到 SpringHealth 案例系统,我们来看基于 Stub 的测试场景,如下图所示:
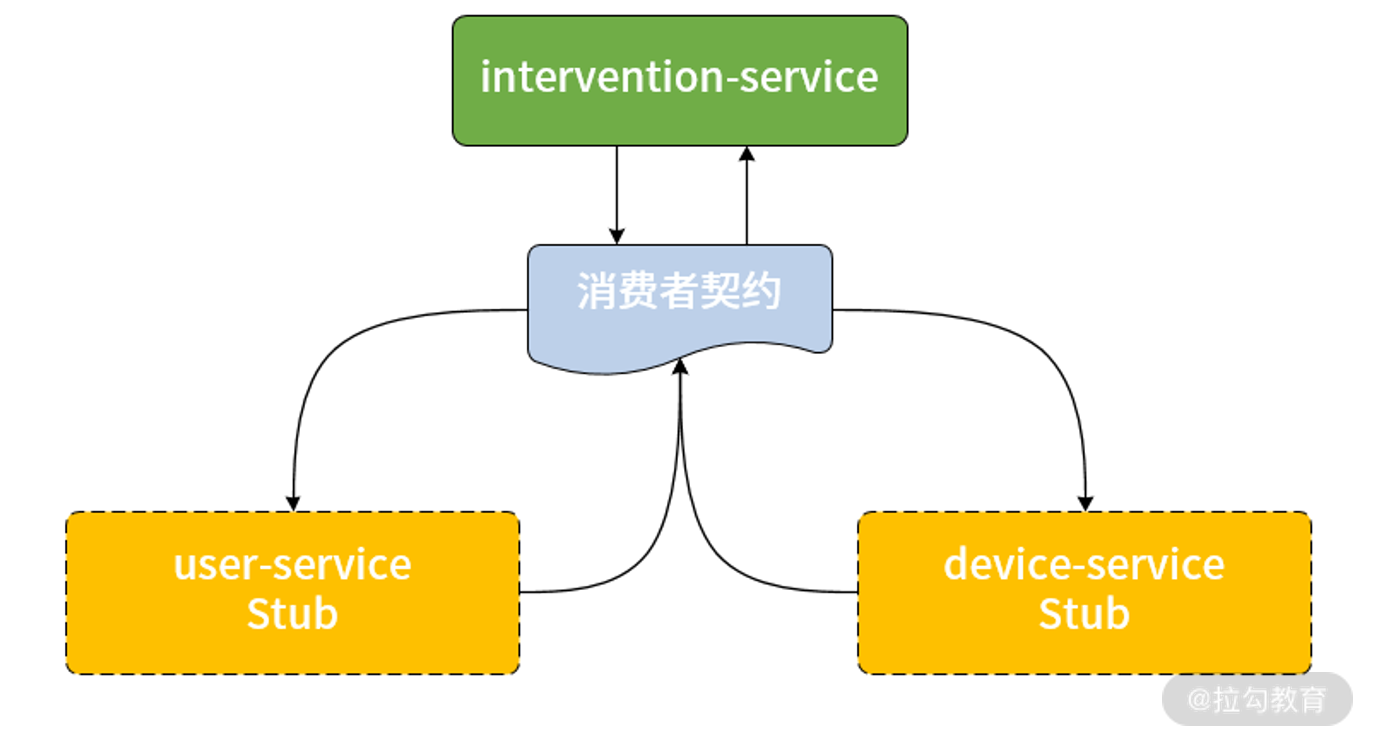
基于 Stub 的 SpringHealth 案例系统测试场景
在上图中,对于 intervention-service 而言,我们希望不需要真正启动所依赖的 user-service 和 device-service 就能完成服务契约的正确性验证。要想实现这一目标,这里的 user-service 和 device-service 就需要提供对应的 Stub 供 intervention-service 进行使用。
当使用 Spring Cloud 开发微服务系统时,集成 Spring Cloud Contract 来作为面向契约的测试工具是最佳选择。Spring Cloud Contract 中提供了契约验证器 Contract Verifier 和 Stub 执行器 Stub Runner 等核心组件,这些组件可以确保能够正确模拟服务端的接口,并在契约发生变化时,让服务端和消费端立即能够发现这种变化。
在接下来的内容中,我们将基于 intervention-service 与 user-service 之间的调用关系来讨论如何基于 Spring Cloud Contract 实现面向契约的端对端测试。我们知道,从业务场景上讲,user-service 相当于服务的提供者,而 intervention-service 是 user-service 的消费者。无论是服务的提供者还是消费者,都需要导入关于 Spring Cloud Contract 的 Maven 依赖,如下所示:
<dependency>
	    <groupId>org.springframework.cloud</groupId>
	    <artifactId>spring-cloud-starter-contract-stub-runner</artifactId>
        <scope>test</scope>
</dependency>

<dependency>
        <groupId>org.springframework.cloud</groupId>
        <artifactId>spring-cloud-starter-contract-verifier</artifactId>
        <scope>test</scope>
</dependency>

<dependency>
        <groupId>org.springframework.cloud</groupId>
        <artifactId>spring-cloud-contract-wiremock</artifactId>
        <scope>test</scope>
</dependency>
基于 Spring Cloud Contract 实现面向契约测试的开发流程比较特殊,也有一定的复杂性,在具体编写案例代码之前,我们有必要先对这个流程做一个梳理,如下所示:
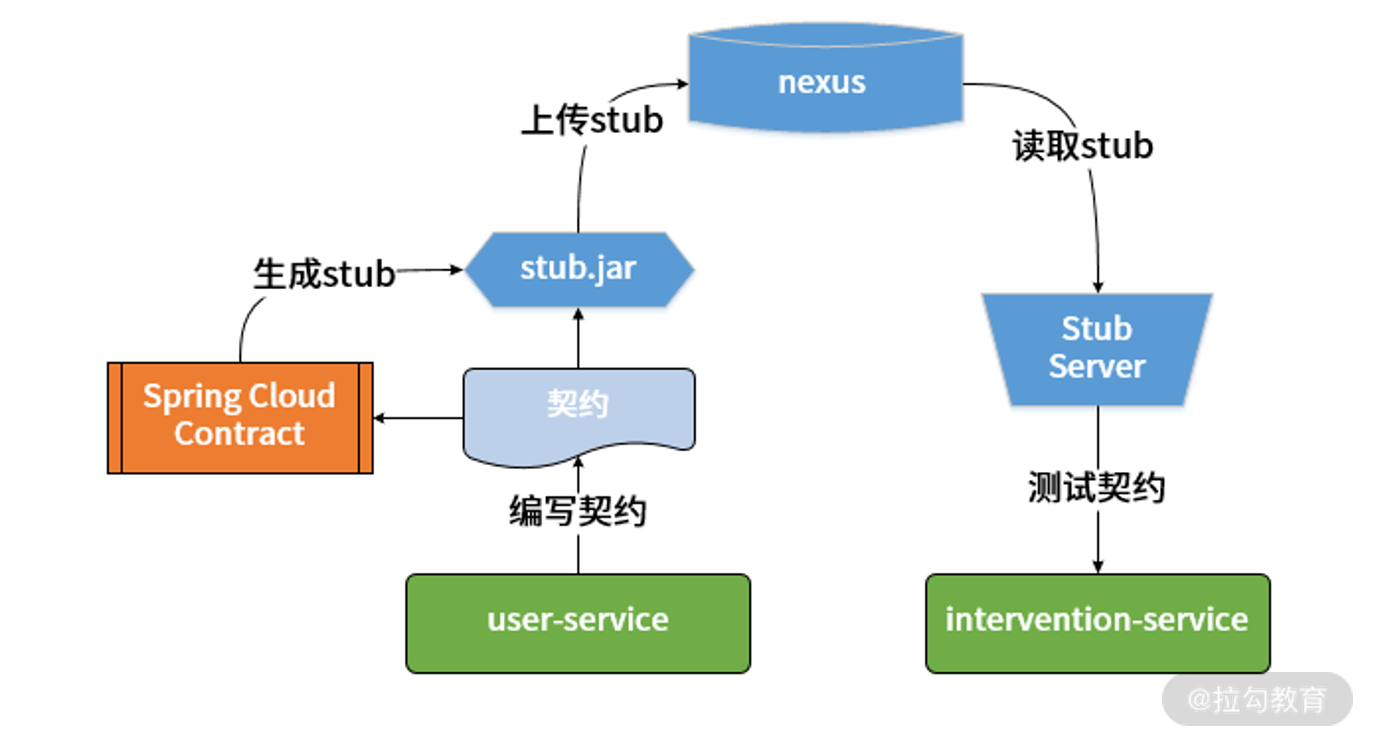
基于 Spring Cloud Contract 实现面向契约测试的开发流程
针对上图,我们先站在服务提供者的角度来看这个流程。显然,服务提供者需要编写契约文件。请注意,Spring Cloud Contract 中的契约文件并不是一个普通的 Java 文件,而是一个支持动态语言的 groovy 文件。有了契约文件之后,基于 Spring Cloud Contract 内置的 Stub 处理机制,我们自动生成一个 Stub 文件,而这个 Stub 文件实际上就是一个 jar 包。然后,我们需要把这个 Stub 文件上传到 Maven 仓库,供服务的消费者进行使用。显然,这里的 Maven 仓库一般指的是我们自己搭建的 nexus 私服。
我们接着讨论服务消费者。对于消费者而言,我们会编写并执行针对契约的测试用例。在执行过程中,Spring Cloud Contract 中的 Stub Runner 组件就会从 Maven 仓库中下载 Stub 文件并使用一个内嵌的 Tomcat 服务器来启动 Stub 服务,这样服务消费者就可以基于既定的测试用例来开展端到端测试。
在接下来的内容中,我们即将围绕 SpringHealth 案例系统给出实现这些步骤的详细过程以及示例代码。
对于 user-service 而言,我们首先要提供了一个 HTTP 端点,所以我们实现了如下所示的 UserController 类:
@RestController
@RequestMapping(value = "users")
public class UserController {

    @Autowired
    private UserRepository repository;
@RequestMapping(path = “/userlist”)
public UserList getUserList() {
UserList userList = new UserList();
userList.setData(repository.findAll());
return userList;
}
}为了演示的简单性,这里省略了 Service 层实现类,而是直接在 Controller 层中调用 Repository 层组件并返回一些数据。在面向契约的测试过程中,这个 UserController 的具体细节其实并不重要,因为我们关注的是服务的对外契约而不是内部实现。
然后,我们在引入 Spring Cloud Contract Verifier 组件之后我们就可以使用该组件来定义契约。前面提到 Spring Cloud 中的契约文件的表现形式是 groovy 文件,这里我们就定义一个 UserContract.groovy 契约文件,如下所示:
import org.springframework.cloud.contract.spec.Contract
import org.springframework.http.HttpHeaders
import org.springframework.http.MediaType

Contract.make {
    description "return all users"

    request {
        url "/users/userlist"
        method GET()
    }

    response {
        status 200
        headers {
            header(HttpHeaders.CONTENT_TYPE, MediaType.APPLICATION_JSON_UTF8_VALUE)
        }
        body("data": [
	[id: 1L, userCode: "user1", userName: "springhealth_user1"],
                  [id: 2L, userCode: "user2", userName: "springhealth_user2"],
[id: 3L, userCode: "user3", userName: "springhealth_user3"]])
    }
}
我们看到以上契约文件中包含三个部分,即 description、request 和 response。其中 description 是对该契约提供的描述信息;request 则定义了请求时的 url 和 method,而 response 显然对返回的 headers 和 body 信息进行了约定。该契约描述的语义也一目了然,就是通过 /users/userlist 这个 URL 来获取一个 JSON 格式的 User 对象列表,该列表将返回三个用户信息。
定义完契约文件之后,接下来我们就可以生成 Stub 文件。Stub 文件在表现形式上也是一个 jar 包,这个 jar 包的目的就是可以被消费者拿来当作一个模拟服务进行启动并在本地运行测试用例,而不需要服务提供者真正启动服务。
我们首先需要在 user-service 中引入 spring-cloud-contract-maven-plugin 插件,spring-cloud-contract-maven-plugin 插件的使用方式如下,该插件在 Maven 打包过程中会自动创建 Stub 文件。
<build>
      <plugins>
         <plugin>
            <groupId>org.springframework.boot</groupId>
            <artifactId>spring-boot-maven-plugin</artifactId>
         </plugin>
         <plugin>
            <groupId>org.springframework.cloud</groupId>
              <artifactId>spring-cloud-contract-maven-plugin
	</artifactId>
            <extensions>true</extensions>
            <configuration>
                <packageForbaseClasses>
	       com.springhealth.user
	</packageForbaseClasses>
            </configuration>
          </plugin>
       </plugins>
</build>
现在我们通过 mvn install –DskipTests=true 命令打包 user-service,除了普通的日志输出之外,控制台还会生成如下信息(为了显示简单做了裁剪):
	[INFO] Copying file UserContract.groovyy
	[INFO] Converting from Spring Cloud Contract Verifier contracts to WireMock stubs mappings
	[INFO]      Spring Cloud Contract Verifier contracts directory: …\user-testing-service\src\test\resources\contracts
	[INFO] WireMock stubs mappings directory: …\user-testing-service \target\stubs\META-INF\com.springhealth\user-testing-service\0.0.1-SNAPSHOT\mappings
	[INFO] Creating new stub […\user-testing-service\target\stubs\META-INF\ com.springhealth\user-testing-service\0.0.1-SNAPSHOT\mappings\UserContract.json]

	Installing …\user-testing-service\target\ user-testing-service-0.0.1-SNAPSHOT-stubs.jar to C:\Users\user\.m2\repository\com\springhealth\user-testing-service \0.0.1-SNAPSHOT\user-testing-service-0.0.1-SNAPSHOT-stubs.jar
根据这些日志信息,我们看到打包过程对 UserContract.groovy 契约文件做了处理。打包完成之后,在 target 目录下会生成两个 jar 包,一个是正常的 user-testing-service-0.0.1-SNAPSHOT.jar 文件,另一个就是新的 Stub 文件。Stub 文件的名称为 user-testing-service-0.0.1-SNAPSHOT-stubs.jar,打开该文件会发现两个文件夹,一个是 contracts 文件夹,内部存放着 UserContract.groovy 契约文件,另一个是 mappings 文件夹,内部存放着 UserContract.json 文件,UserContract.json 文件是用 JSON 格式对 UserContract.groovy 契约文件的一种数据转换。
生成 Stub 文件之后,我们还需要做的事情是通过 install 命令将该 Stub 文件上传到 Maven 仓库,以便消费者通过 pom 中定义的 group-id 和 artifact-id 加载该 jar 包。至此,服务提供者的开发工作告一段落。
现在回到服务消费者端编写测试用例 InterventionApplicationTests 类,该类展示了典型的 Spring Cloud Contract 端到端测试用例代码风格。其中的 testGetUsers() 测试用例使用 RestTemplate 访问远程 HTTP 端点并验证返回数据的正确性,如下所示:
import org.junit.Assert;
import org.junit.Test;
import org.junit.runner.RunWith;
import org.springframework.beans.factory.annotation.Autowired;
import org.springframework.boot.test.context.SpringBootTest;
import org.springframework.cloud.contract.stubrunner.spring.AutoConfigureStubRunner;
import org.springframework.core.ParameterizedTypeReference;
import org.springframework.http.HttpMethod;
import org.springframework.http.ResponseEntity;
import org.springframework.test.context.junit4.SpringRunner;
import org.springframework.web.client.RestTemplate;

@RunWith(SpringRunner.class)
@SpringBootTest(classes = InterventionApplication.class, webEnvironment = SpringBootTest.WebEnvironment.RANDOM_PORT)
@AutoConfigureStubRunner(ids = { "com.springhealth:user-testing-service:+:8080" }, workOffline = true)
public class InterventionApplicationTests {

    @Autowired
    private RestTemplate restTemplate;

    @Test
    public void testGetUsers() {
        ParameterizedTypeReference<UserList> ptf = new ParameterizedTypeReference<UserList>() {
        };
ResponseEntity<UserList> responseEntity = restTemplate.exchange(“http://localhost:8080/user/userlist”,
HttpMethod.GET, null, ptf);Assert.assertEquals(3, responseEntity.getBody().getData().size());
}
}以上代码中引入了一个新的注解 @AutoConfigureStubRunner,通过该注解来自动注入一个 StubRunner。@AutoConfigureStubRunner 注解包含两个参数,即 ids 和 workOffline。其中最重要的就是需要指定 ids 参数。
ids 参数用于定位存放在 Maven 仓库中的 Stub 包,然后在指定端口启动该 Stub 包中的服务。ids 的格式为 groupId:artifactId:version:classifier:port。这里"com.springhealth: user-testing-service:+:8080"表示去 Maven 仓库定位上一个步骤中上传的 user-testing-service-0.0.1-SNAPSHOT-stubs.jar 包并在 8080 端口中启动服务。
执行 InterventionApplicationTests,我们会在控制台中看到很多日志输出,其中重要的信息如下所示。可以看到在执行过程中 StubRunner 会下载 Stub 文件,将该 jar 文件解压到临时目录并启动了内嵌的 Tomcat 监听 8080 端口,然后注册相应的 servlet 并最终运行所有的 Stubs,部分核心日志信息如下所示:
	o.s.c.c.s.StubDownloaderBuilderProvider  : Will download stubs using Aether
	o.s.c.c.stubrunner.AetherStubDownloader  : Remote repos not passed but the switch to work offline was set. Stubs will be used from your local Maven repository.
	o.s.c.c.stubrunner.AetherStubDownloader  : Desired version is [+] - will try to resolve the latest version
	o.s.c.c.stubrunner.AetherStubDownloader  : Resolved version is [0.0.1-SNAPSHOT]
	o.s.c.c.stubrunner.AetherStubDownloader  : Resolving artifact [com.springhealth: user-testing-service:jar:stubs:0.0.1-SNAPSHOT] using remote repositories []
	o.s.c.c.stubrunner.AetherStubDownloader  : Resolved artifact [com.springhealth: user-testing-service:jar:stubs:0.0.1-SNAPSHOT] to C:\Users\user\.m2\repository\com\ springhealth\user-testing-service\0.0.1-SNAPSHOT\user-testing-service-0.0.1-SNAPSHOT-stubs.jar
	o.s.c.c.stubrunner.AetherStubDownloader  : Unpacking stub from JAR [URI: file:/C:/Users/user/.m2/repository/com/springhealth/user-testing-service/0.0.1-SNAPSHOT/user-testing-service-0.0.1-SNAPSHOT-stubs.jar]
	…
	s.b.c.e.t.TomcatEmbeddedServletContainer : Tomcat initialized with port(s): 8080 (http)
	o.apache.catalina.core.StandardService   : Starting service [Tomcat]
	org.apache.catalina.core.StandardEngine  : Starting Servlet Engine: Apache Tomcat/8.5.23
	o.a.c.c.C.[Tomcat-1].[localhost].[/]     : Initializing Spring embedded WebApplicationContext
	o.s.web.context.ContextLoader            : Root WebApplicationContext: initialization completed in 512 ms
	o.s.b.w.servlet.ServletRegistrationBean  : Mapping servlet: 'stub' to [/]
	o.s.b.w.servlet.ServletRegistrationBean  : Mapping servlet: 'admin' to [/__admin/*]
	s.b.c.e.t.TomcatEmbeddedServletContainer : Tomcat started on port(s): 8080 (http)
	o.s.c.contract.stubrunner.StubServer     : Started stub server for project [com.springhealth: user-testing-service:0.0.1-SNAPSHOT:stubs] on port 8080
	o.a.c.c.C.[Tomcat-1].[localhost].[/]     : RequestHandlerClass from context returned com.github.tomakehurst.wiremock.http.AdminRequestHandler. Normalized mapped under returned 'null'
	o.s.c.c.stubrunner.StubRunnerExecutor    : All stubs are now running RunningStubs [namesAndPorts={com.springhealth: user-testing-service:0.0.1-SNAPSHOT:stubs=8080}]
在上面的日志中,我们看到 servlet 生成了 /__admin/* 映射。该端点在测试用例执行完成之后会自动消失,所以可以在 testGetUsers() 方法中打一个断点,然后执行测试用例就可以访问这些自动生成的 HTTP 端点信息。当访问 http://localhost:8080/__admin/ 端点,我们可以获取根据 UserContract 契约生成的用于 Stub 的 JSON 数据,如下所示:
{
	    "mappings":[
	        {
	            "id":"b134a01f-d983-4a05-8889-b1d5aa2e8781",
	            "request":{
	                "url":"/userlist/",
	                "method":"GET"
	            },
	            "response":{
                "status":200, "body":"{"data":[{"id":1," userCode":"user1",
"userName":"springhealth_user1"},{"id":2," userCode":"user2","userName":"springhealth_user2"},{"id":3," userCode":"user3","userName":"springhealth_user3"}]}",
	                "headers":{
	                    "Content-Type":"application/json;charset=UTF-8"
	                },
	                "transformers":[
	                    "response-template"
	                ]
	            },
	            "uuid":"b134a01f-d983-4a05-8889-b1d5aa2e8781"
	        },
	        {
	            "id":"02f3f379-ce66-4136-8b35-7b2fd1aafec9",
	            "request":{
	                "url":"/user",
	                "method":"GET"
	            },
	            "response":{
	                "status":200,
	                "body":"OK"
	            },
	            "uuid":"02f3f379-ce66-4136-8b35-7b2fd1aafec9"
	        },
	        {
	            "id":"d5ae77de-dddd-43b3-b1a3-19145ee5582d",
	            "request":{
	                "url":"/ping",
	                "method":"GET"
	            },
	            "response":{
	                "status":200,
	                "body":"OK"
	            },
	            "uuid":"d5ae77de-dddd-43b3-b1a3-19145ee5582d"
	        }
	    ],
	    "meta":{
	        "total":3
	    }
}
Spring Cloud Contract 在内部集成了 WireMock 工具,该工具通过这些 JSON 数据来模拟定义的接口。同时,在执行测试用例的过程中,我们可以访http://localhost:8080/users/userlist 端点来获取所生成的接口数据,正如我们所预想的一样,返回的数据如下所示:
{
	    "data":[
	        {
	            "id":1,
	            "userCode":"user1",
	            "userName":"springhealth_user1"
	        },
	        {
	            "id":2,
	            "userCode":"user2",
	            "userName":"springhealth_user2"
	        },
	{
	            "id":3,
	            "userCode":"user3",
	            "userName":"springhealth_user3"
	        }
	    ]
}
通过整个流程,我们注意到服务提供者是基于消费者的契约来开发接口,而测试用例则是由 Spring Cloud Contract Verifier 根据契约所生成,因此就形成了对契约的一种约束,也就是消费者对服务提供者的约束。如果服务提供者不能满足测试用例则意味着契约已经发生了变化,这正是面向契约的端对端测试的本质所在。
如果你已经解决了该问题, 非常希望你能够分享一下解决方案, 写成博客, 将相关链接放在评论区, 以帮助更多的人 ^-^