opencv-python边缘检测与拟合
问题遇到的现象和发生背景
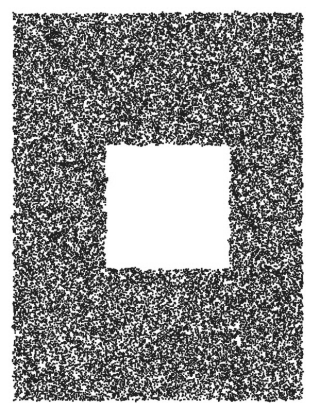
具有很多点不光滑的图像,提取拟合边界矩形
问题相关代码,请勿粘贴截图
# -*- coding: UTF-8 -*-
import cv2
import numpy as np


# 定义形状检测函数
def ShapeDetection(img):
    contours, hierarchy = cv2.findContours(img, cv2.RETR_EXTERNAL, cv2.CHAIN_APPROX_NONE)  # 寻找轮廓点

    for obj in contours:

        area = cv2.contourArea(obj)  # 计算轮廓内区域的面积
        print(area)
        cv2.drawContours(imgContour, obj, -1, (255, 0, 0), 4)  # 绘制轮廓线
        perimeter = cv2.arcLength(obj, True)  # 计算轮廓周长
        print(perimeter)
        approx = cv2.approxPolyDP(obj, 0.02*perimeter, True)  # 获取轮廓角点坐标
        CornerNum = len(approx)   # 轮廓角点的数量
        x, y, w, h = cv2.boundingRect(approx)  # 获取坐标值和宽度、高度

        # 轮廓对象分类
        if CornerNum == 3: objType = "triangle"
        elif CornerNum == 4:
            if w == h: objType= "Square"
            else: objType = "Rectangle"
        elif CornerNum > 4: objType = "Circle"
        else: objType = "N"

        cv2.rectangle(imgContour, (x, y), (x+w, y+h), (0, 0, 255), 2)  # 绘制边界框
        cv2.putText(imgContour, objType, (x+(w//2), y+(h//2)), cv2.FONT_HERSHEY_COMPLEX, 0.6, (0, 0, 0), 1)  # 绘制文字


path = 'zr.jpg'
img = cv2.imread(path)
imgContour = img.copy()

imgGray = cv2.cvtColor(img, cv2.COLOR_RGB2GRAY)  # 转灰度图
imgBlur = cv2.GaussianBlur(imgGray, (9, 9), 1)  # 高斯模糊
imgCanny = cv2.Canny(imgBlur, 250, 300)  # Canny算子边缘检测
ShapeDetection(imgCanny)  # 形状检测

cv2.imshow("Original img", img)
cv2.imshow("imgGray", imgGray)
cv2.imshow("imgBlur", imgBlur)
cv2.imshow("imgCanny", imgCanny)
cv2.imshow("shape Detection", imgContour)

cv2.waitKey(0)
运行结果及报错内容
这是灰度图
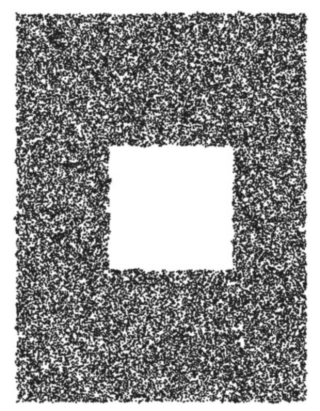
采用高斯平滑后的图:
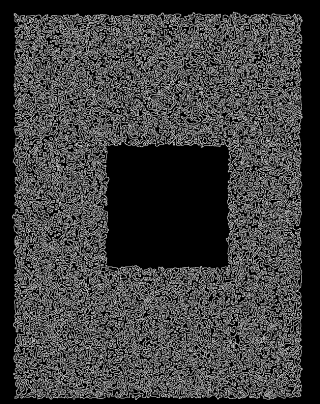
canny检测后:
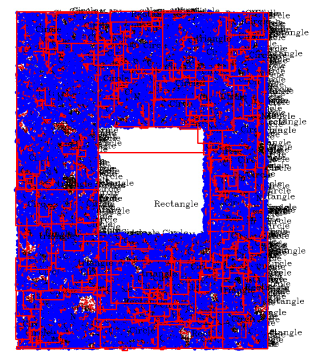
结果:
我的解答思路和尝试过的方法
我尝试调了高斯模糊和canny的阈值,但是没有用。
试了直线拟合
我想要达到的结果
我想要只提取内外两个矩形轮廓,像这样子:
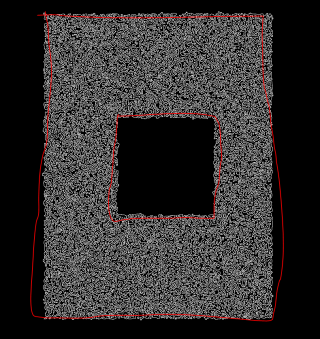
请问应该怎么做呢
    img = cv2.imread("../images/test01.png")  # 添加的前景图像
    gray = cv2.cvtColor(img, cv2.COLOR_BGR2GRAY)  # 灰度图像
    _, binary = cv2.threshold(gray, 127, 255, cv2.THRESH_OTSU+cv2.THRESH_BINARY)
    invert = cv2.bitwise_not(binary)
    kernel = cv2.getStructuringElement(cv2.MORPH_ELLIPSE, (5, 5))  # (5, 5) 结构元
    dilate = cv2.dilate(invert, kernel=kernel, iterations=2)  # 图像膨胀
    contours, hierarchy = cv2.findContours(dilate, cv2.RETR_TREE, cv2.CHAIN_APPROX_SIMPLE)  # OpenCV4~
    contourPic = cv2.drawContours(img.copy(), contours, -1, (0, 0, 255), 2)  # OpenCV3
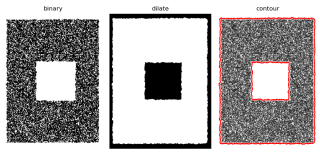
在进行轮廓提取前先进行形态学变化。去除一些干扰。
谢邀,我也是参考的网上的资料,希望这两个对你有所帮助
https://blog.csdn.net/bubid/article/details/108562086
https://blog.51cto.com/u_15127580/3385300
首先做二值化处理,再用getStructuringElement()生成一个结构元,后面两步要用到这个结构元,1.使用dilate膨胀图像,2.膨胀后再用erode做腐蚀。(或者使用闭操作)