如何使用opencv清晰地提取图像中的六边形轮廓,求效果及代码
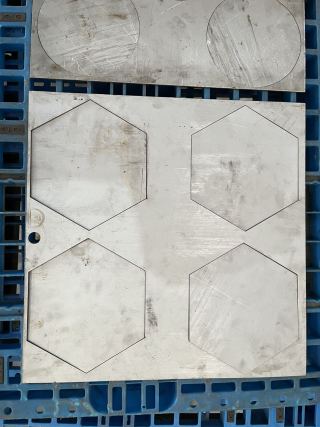
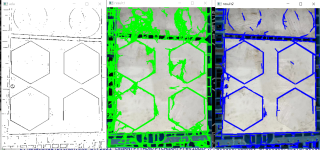
本人初学者一名,上图是我提取出来的轮廓,图像去噪效果不是很好,还是有很多,效果太差,分别使用了sobel,canny锐化边缘,用了高斯模糊除了,效果还是没有明显改善,向各位请教一下有什么好的方法能够吧图像中的六边形高质量的完全提取出来吗
安装imutils
pip install imutils
代码
ShapeDetector.Py
import cv2
class ShapeDetector:
    def __init__(self):
        pass
    def detect(self, c):
        shape = ""
        peri = cv2.arcLength(c, True)
        approx = cv2.approxPolyDP(c, 0.04 * peri, True)
        if len(approx) == 6:
        shape ="六边形"
        return shape
detect_shapes.py
from pyimagesearch.shapedetector import ShapeDetector
import argparse
import imutils
import cv2

ap = argparse.ArgumentParser()
ap.add_argument("-i", "--image", required=True,
    help="输入图像的路径")
args = vars(ap.parse_args())
image = cv2.imread(args["image"])
resized = imutils.resize(image, width=300)
ratio = image.shape[0] / float(resized.shape[0])
gray = cv2.cvtColor(resized, cv2.COLOR_BGR2GRAY)
blurred = cv2.GaussianBlur(gray, (5, 5), 0)
thresh = cv2.threshold(blurred, 60, 255, cv2.THRESH_BINARY)[1]
cnts = cv2.findContours(thresh.copy(), cv2.RETR_EXTERNAL,
    cv2.CHAIN_APPROX_SIMPLE)
cnts = imutils.grab_contours(cnts)
sd = ShapeDetector()
for c in cnts:
    M = cv2.moments(c)
    cX = int((M["m10"] / M["m00"]) * ratio)
    cY = int((M["m01"] / M["m00"]) * ratio)
    shape = sd.detect(c)
    c = c.astype("float")
    c *= ratio
    c = c.astype("int")
    cv2.drawContours(image, [c], -1, (0, 255, 0), 2)
    cv2.putText(image, shape, (cX, cY), cv2.FONT_HERSHEY_SIMPLEX,
        0.5, (255, 255, 255), 2)
    cv2.imshow("Image", image)
    cv2.waitKey(0)
python detect_shapes.py --image 你的图形文件.png
如果你只想找图像中的六边形部分,建议你直接用一个六边形模板直接匹配,不过这样泛化性差,但是泛化性差带来的好处就是只从图像中提取六边形。
一、图像轮廓
** 1. cv2.findContours(img,mode, method) 找出图中的轮廓值,得到的轮廓值都是嵌套格式的**
            参数说明:

                    img表示输入的图片,

                    mode表示轮廓检索模式,通常都使用RETR_TREE找出所有的轮廓值,

                    method表示轮廓逼近方法,使用NONE表示所有轮廓都显示

  **  2. cv2.cvtcolor(img, cv2.COLOR_BGR2GRAY)  将彩色图转换为灰度图**

            参数说明:

                    img表示输入的图片,

                    cv2.COLOR_BGR2GRAY表示颜色的变换形式

 **   3. cv2.drawContours(img, contours, -1, (0, 0, 255), 2)  画出图片中的轮廓值,也可以用来画轮廓的近似值**

            参数说明:

                    img表示输入的需要画的图片,

                    contours表示轮廓值,

                    -1表示轮廓的索引,

                    (0, 0, 255)表示颜色,

                    2表示线条粗细

    ** 4. cv2.contourArea(cnt, True)   计算轮廓的面积**

            参数说明:cnt为输入的单个轮廓值

   ** 5. cv2.arcLength(cnt, True)    计算轮廓的周长**

            参数说明:cnt为输入的单个轮廓值
   ** 6. cv2.aprroxPolyDP(cnt, epsilon, True)  用于获得轮廓的近似值,使用cv2.drawCountors进行画图操作**

             参数说明:

                    cnt为输入的轮廓值,

                    epsilon为阈值T,通常使用轮廓的周长作为阈值,

                    True表示的是轮廓是闭合的

 **   7. x, y, w, h = cv2.boudingrect(cnt)   获得外接矩形**

            参数说明:

                    x,y, w, h 分别表示外接矩形的x轴和y轴的坐标,以及矩形的宽和高,

                    cnt表示输入的轮廓值

   ** 8. cv2.rectangle(img, (x, y), (x+w, y+h), (0, 255, 0), 2)   根据坐标在图像上画出矩形**

            参数说明:

                    img表示传入的图片,

                    (x, y)表示左上角的位置,

                    (x+w, y+h)表示加上右下角的位置,

                    (0, 255, 0)表示颜色,

                    2表示线条的粗细

 **   9. (x, y), radius = cv2.minEnclosingCircle(cnt)  获得外接圆的位置信息**

            参数说明:

                    (x, y)表示外接圆的圆心,

                    radius表示外接圆的半径,

                    cnt表示输入的轮廓

 **   10. cv2.Cricle(img, center, radius, (0, 255, 0), 2)  根据坐标在图上画出圆**

            参数说明:

                    img表示需要画的图片,

                    center表示圆的中心点,

                    radius表示圆的半径,

                    (0, 255, 0)表示颜色,

                    2表示线条的粗细

   ** 11. 轮廓检测:**

            轮廓检测相较于canny边缘检测,轮廓检测的线条要更少一些,在opencv中,使用的函数是cv2.findCountor进行轮廓检测。


注:上图是轮廓检测过程中所使用的方法,一般我们使用mode RETR_TREE检测出所有的轮廓值, 对于method方法的区别在一种把边缘都检测出来,一种压缩在拐点位置
二、案例
1.轮廓检测与画图:
import cv2


"""
第一步:载入图片
第二步:使用cv2.cvtcolor() 将图片转换为灰度图
第三步: 使用cv2.threshold将图片做二值化转换
第四步:使用cv2.findContours 找出图片的轮廓值
第五步:使用cv2.drawContours在图片上画上轮廓
第六步: 使用cv2.imshow 完成画图操作
"""


import numpy as np

def cv_show(img, name):
    cv2.imshow(name, img)
    cv2.waitKey(0)
    cv2.destroyAllWindows()


# 第一步读入图片
img = cv2.imread('car.png')
# 第二步:对图片做灰度变化
gray = cv2.cvtColor(img, cv2.COLOR_BGR2GRAY)
# 第三步:对图片做二值变化
ret, thresh = cv2.threshold(gray, 127, 255, cv2.THRESH_BINARY)

# 第四步:获得图片的轮廓值
Binary, contours, h = cv2.findContours(thresh, cv2.RETR_TREE, cv2.CHAIN_APPROX_NONE)

# 第五步:在图片中画出图片的轮廓值
draw_img = img.copy()
ret = cv2.drawContours(draw_img, contours, -1, (0, 0, 255), 2)
# 第六步:画出带有轮廓的原始图片
cv_show(ret, 'ret')
- 轮廓的周长和面积
"""
使用cv2.findCountor获得的轮廓contours是一个嵌套的类型,即我们可以通过cnt = contours获得第一个物体的轮廓值
第一步:载入图片,做灰度值和二值化处理,并使用cv2.findCountor找出轮廓值,使用cv2.drawCountors画出第一个图像的轮廓
第二步:通过索引取出第一个轮廓值cnt,使用cv2.ContourArea()计算轮廓的面积
第三步:使用cv2.arcLength 获得轮廓的周长
"""
# 使用另外一个图进行轮廓的测试

# 第一步:载入图片,灰度化和二值化处理,使用cv2.findContours找出轮廓, 使用cv2.drawContours进行画图操作
img = cv2.imread('contours.png')
gray = cv2.cvtColor(img, cv2.COLOR_BGR2GRAY)
ret, thresh = cv2.threshold(gray, 127, 255, cv2.THRESH_BINARY)

binary, contours, h = cv2.findContours(thresh, cv2.RETR_TREE, cv2.CHAIN_APPROX_NONE)

draw_img = img.copy()
# 参数说明,draw_img 需要作图的原始图像, contours表示轮廓, 0表示轮廓索引, (0, 0, 255)表示颜色, 2表示线条粗细
ret = cv2.drawContours(draw_img, contours, 0, (0, 0, 255), 2)
cv_show(ret, 'ret')
# 取出单个的轮廓值
cnt = contours[0]

# 第二步:计算轮廓的面积
area = cv2.contourArea(cnt)

# 第三步: 计算轮廓的周长
length= cv2.arcLength(cnt, True)

print(area, length)
- 轮廓近似(RDP), 假设存在一个曲线A, B,在曲线上存在一个C点,离AB线段的距离最远,记为d1, 如果d1 < T(自己设定的阈值), 将AB线段作为AB曲线的替代,否者连接AC和BC, 计算AC线段上的D点离AB距离最远,记为d2,如果d2 < T,则使用AC线段替代AC曲线,否者继续连接划
"""
第一步:读取图片,灰度化和二值化,使用cv2.findcontours找出轮廓
第二步:使用轮廓索引提取第一个轮廓值
第三步:使用cv2.arcLength即轮廓周长的倍数作为阈值,阈值越小,轮廓与轮廓的越近似
第四步:使用cv2.approxPolyDP(cnt, epilison)
第五步:使用cv2.drawContours进行画图操作
"""
import cv2
import numpy as np

def cv_show(img, name):
    cv2.imshow(name, img)
    cv2.waitKey(0)
    cv2.destroyAllWindows()


# 第一步读入图片
img = cv2.imread('car.png')
# 第二步:对图片做灰度变化
gray = cv2.cvtColor(img, cv2.COLOR_BGR2GRAY)
# 第三步:对图片做二值变化
ret, thresh = cv2.threshold(gray, 127, 255, cv2.THRESH_BINARY)

# 第四步:获得图片的轮廓值
Binary, contours, h = cv2.findContours(thresh, cv2.RETR_TREE, cv2.CHAIN_APPROX_NONE)

# 第五步:在图片中画出图片的轮廓值
draw_img = img.copy()
ret = cv2.drawContours(draw_img, contours, -1, (0, 0, 255), 2)
# 第六步:画出带有轮廓的原始图片
cv_show(ret, 'ret')


# 使用另外一个图进行轮廓的测试

# 第一步:载入图片,灰度化和二值化处理,使用cv2.findContours找出轮廓, 使用cv2.drawContours进行画图操作
img = cv2.imread('contours.png')
gray = cv2.cvtColor(img, cv2.COLOR_BGR2GRAY)
ret, thresh = cv2.threshold(gray, 127, 255, cv2.THRESH_BINARY)

binary, contours, h = cv2.findContours(thresh, cv2.RETR_TREE, cv2.CHAIN_APPROX_NONE)

draw_img = img.copy()
# 参数说明,draw_img 需要作图的原始图像, contours表示轮廓, 0表示轮廓索引, (0, 0, 255)表示颜色, 2表示线条粗细
ret = cv2.drawContours(draw_img, contours, 0, (0, 0, 255), 2)
cv_show(ret, 'ret')
# 取出单个的轮廓值
cnt = contours[0]

# 第二步:计算轮廓的面积
area = cv2.contourArea(cnt)

# 第三步: 计算轮廓的周长
length= cv2.arcLength(cnt, True)

print(area, length)


# 轮廓近似
img = cv2.imread('contours2.png')
gray = cv2.cvtColor(img, cv2.COLOR_BGR2GRAY)
ret, thresh = cv2.threshold(gray, 127, 255, cv2.THRESH_BINARY)

Binary, contours, h = cv2.findContours(thresh, cv2.RETR_TREE, cv2.CHAIN_APPROX_NONE)

cnt = contours[0]

# 使用周长的倍数作为阈值,阈值越小,图像的轮廓近似与轮廓越近似
epsilon = 0.1 * cv2.arcLength(cnt, True)

approx = cv2.approxPolyDP(cnt, epsilon, True)

draw_img = img.copy()
ret = cv2.drawContours(draw_img, [approx], -1, (0, 0, 255), 2)
cv_show(ret, 'ret')
- 外接矩形和外接圆
外接矩形: 使用cv2.boudingrect(cnt)获得轮廓的外接矩形,使用cv2.rectangle(img, (x, y), (x+w, y+h), (0, 0, 255), 2)画出矩阵的轮廓
外接圆: 使用cv2.minEnclosingCircle(cnt)获得轮廓的外接圆,使用cv2.circle(ret, centers, radius, (0, 0, 255), 2)画出圆的轮廓
"""
第一步:载入图片,灰度化,二值化,使用cv2.findCountors找出图像的轮廓,使用轮廓索引获得第一个轮廓cnt
第二步:使用cv2.boundingrect(cnt) ,获得轮廓的x,y,w, h (x, y)表示左上角的坐标,w为宽,h为长
第三步: 使用cv2.rectangle 绘制外接的轮廓
第四步: 使用cv2.minEnclosingCircle(cnt), 获得center和radius,即圆心点的坐标和圆的半径
第五步: 使用cv2.circle(img, center, radius, (0, 0, 255), 2) 绘制圆心的外接轮廓
"""

# 外接矩阵

img = cv2.imread('contours.png')
gray = cv2.cvtColor(img, cv2.COLOR_BGR2GRAY)
res, thresh = cv2.threshold(gray, 127, 255, cv2.THRESH_BINARY)

binary, contours, h = cv2.findContours(thresh, cv2.RETR_TREE, cv2.CHAIN_APPROX_NONE)

cnt = contours[0]

x, y, w, h = cv2.boundingRect(cnt)

ret = cv2.rectangle(img, (x, y), (x+w, y+h), (0, 0, 255), 2)
cv_show(ret, 'ret')

print('矩形面积 / 外接矩形面积', cv2.contourArea(cnt) / (w*h))
# 外接圆

(x, y), radius = cv2.minEnclosingCircle(cnt)
center = (int(x), int(y))
radius = int(radius)
ret = cv2.circle(ret, center, radius, (0, 255, 0), 2)
cv_show(ret, 'ret')