java一般怎么连接硬件呢
想问下各位专家,一般java都是通过什么技术来实现硬件通讯的
要看你硬件支持什么协议了。mqtt想多多一些
通讯就那么多种
比如TCP/IP,就用socket
串口用series
你具体是要和什么硬件通讯呢,硬件支持什么接口呢
- 你可以参考下这个问题的回答, 看看是否对你有帮助, 链接: https://ask.csdn.net/questions/743255
- 这篇博客你也可以参考下:Java虚拟机常见内存溢出错误汇总,Java中常见的坑看了可以少走点弯路
- 同时,你还可以查看手册:java-学习Java语言 - 描述Java编程语言的基本概念和特点的课程。-类和对象》描述了如何编写创建对象的类,以及如何创建和使用对象。-物品 中的内容
- 除此之外, 这篇博客: java访问控制权限【从设计思想入手,深入理解java的访问权限控制】中的 设计访问控制的原因 部分也许能够解决你的问题, 你可以仔细阅读以下内容或跳转源博客中阅读:
- 1.设定程序调用方可以使用和不可以使用的范围。
- 2.让类的设计者可以更改类的内部实现。
1.设定使用范围
对于类的内部实现,在进行程序设计时,设计者不愿意(或者认为没有必要)让调用方使用的属性和方法,就可以使用private修饰,这样一来指定的方法和属性就仅能在类的内部使用。
本文从方法层面来说明访问控制机制,从单一的角度加以说明,会更加容易理解。
这里以String举例,String类中有很多方法,但能允许我们访问的只有一部分而已。
下图为String类的部分方法,在idea中通过快捷键 Alt+7,可查看所有方法。
经过统计,在java版本1.8.0_77中,String类总共有92个方法。
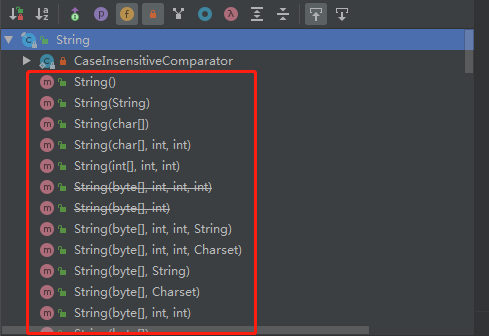
而我们能够调用的,却只有52个而已。(下图为部分可调用方法)

而这其中,不允许被调用的40个方法,为什么会被定义成private类型的,不允许在其他类中使用呢?
我们来看一个例子。
/* Common private utility method used to bounds check the byte array
* and requested offset & length values used by the String(byte[],..)
* constructors.
*/
private static void checkBounds(byte[] bytes, int offset, int length) {
	if (length < 0)
    throw new StringIndexOutOfBoundsException(length);
    if (offset < 0)
    throw new StringIndexOutOfBoundsException(offset);
    if (offset > bytes.length - length)
    throw new StringIndexOutOfBoundsException(offset + length);
}
checkBounds()方法,是我从String类中随意抽取的一个被private修饰的方法。
第一眼看上去是不是不明白是什么意思?没关系,首先读注释。
Common private utility method used to bounds check the byte array and requested offset & length values used by the String(byte[],…) constructors.
翻译:用于检查字节数组和字符串(byte[],…)构造函数使用的请求的偏移量和长度值的公共专用工具方法。
从方法的注释大概可以看出,这是String类中用于字节数组和字符串的安全检查的方法。
至于方法具体是什么地方调用、为了解决什么问题的,除非我们是为了研究String的源代码,否则没有必要再看下去。
因为,我们已经可以得出一个结论,checkBounds()方法并不是我们在程序开发的过程中需要关心的方法,所以它被定义成了private。
52个可用的方法,已经足够我们使用了,只关注必要的方法可以降低学习类库的成本。
所以,使用访问控制,可以让程序员关注只需要关注的部分,明确自己可操作和不可操作的权限范围。
2.更改类的内部实现
设置访问权限的另一点,是为了可以随意更改我们提供的java类,所以我们在进行程序开发时,只提供必要的public方法。
在此用反例来说明这一点,如果一个工具类中,所有的方法和属性都是public时,会发生什么情况。
当前有一个登陆工具类,类中有三个方法如下:
- public User login(String userName,String pwd){ … } 登陆方法
- public List getRoles(){ … } 根据当前用户,获取角色信息
- public String encryption(String pwd){ … } 加密方法,根据明文,返回密文
此时工具类投入使用,而事实上,工具类的使用方在开发时只需要用到登陆和获取角色的方法,至于加密的方法根本就不是设计给其他类调用的,加密方法的用途仅仅是登录时将用户传递的明文转换成密文,在login()内部使用。
此处我们的加密算法使用的是md5,恰好此时有一个需求是记录用户设置的某文档密码,组内的小伙伴一看登录工具类中提供了加密方法,直接就拿来用了!!
就在这时,我们意识到md5加密算法不能保证足够强的安全性,需要引入一个成熟又强大的工具包来进行密码的加密处理。
所以我们把加密方法encryption()从登陆工具类删除了。
紧接着,悲剧了,项目里所有用到encryption()方法的地方,全都报错了… …
而如果我们一开始就将encryption()定义为private,也就不会发生这样的悲剧了。
借这个例子,我们就能理解java语言的设计者,要设计访问控制的第二个原因:为了让类的设计者能够修改类的内部工作方式(可以任意修改内部实现)
- 您还可以看一下 唐世林老师的Java面试题精选集锦课程中的 【Java基础】什么是内存泄漏,与内存溢出有什么关系?小节, 巩固相关知识点
- 以下回答由chatgpt基于相关博客总结生成:
在Java中,可以使用以下几种技术来实现与硬件的连接和通讯:
- 使用串口通信库:通过串口通信库,可以与硬件设备进行串口通信。常用的Java串口通信库有RXTX和JSerialComm。可以使用这些库来打开、读取、写入和关闭串口,并与硬件设备进行通信。
下面是使用RXTX库来实现串口通信的示例代码:
import gnu.io.CommPortIdentifier;
import gnu.io.PortInUseException;
import gnu.io.SerialPort;
import gnu.io.SerialPortEvent;
import gnu.io.SerialPortEventListener;
import gnu.io.UnsupportedCommOperationException;

import java.io.IOException;
import java.io.InputStream;
import java.io.OutputStream;
import java.util.Enumeration;

public class SerialCommunicationExample implements SerialPortEventListener {
    private SerialPort serialPort;
    private InputStream inputStream;
    private OutputStream outputStream;

    public void initialize() {
        CommPortIdentifier portId = null;
        Enumeration portEnum = CommPortIdentifier.getPortIdentifiers();

        while (portEnum.hasMoreElements()) {
            CommPortIdentifier currPortId = (CommPortIdentifier) portEnum.nextElement();
            if (currPortId.getName().equals("COM1")) { // 这里的COM1是要连接的串口号,根据实际情况进行修改
                portId = currPortId;
                break;
            }
        }

        if (portId == null) {
            System.out.println("Could not find COM port.");
            return;
        }

        try {
            serialPort = (SerialPort) portId.open(this.getClass().getName(), 2000);
            serialPort.setSerialPortParams(9600, SerialPort.DATABITS_8, SerialPort.STOPBITS_1, SerialPort.PARITY_NONE);

            inputStream = serialPort.getInputStream();
            outputStream = serialPort.getOutputStream();

            serialPort.addEventListener(this);
            serialPort.notifyOnDataAvailable(true);
        } catch (PortInUseException | UnsupportedCommOperationException | IOException e) {
            e.printStackTrace();
        }
    }

    public void sendData(String data) {
        try {
            outputStream.write(data.getBytes());
            outputStream.flush();
        } catch (IOException e) {
            e.printStackTrace();
        }
    }

    public synchronized void close() {
        if (serialPort != null) {
            serialPort.removeEventListener();
            serialPort.close();
        }
    }

    public synchronized void serialEvent(SerialPortEvent serialPortEvent) {
        if (serialPortEvent.getEventType() == SerialPortEvent.DATA_AVAILABLE) {
            try {
                int availableBytes = inputStream.available();
                byte[] data = new byte[availableBytes];
                inputStream.read(data);
                System.out.println("Received data: " + new String(data));
            } catch (IOException e) {
                e.printStackTrace();
            }
        }
    }
}
上述代码通过RXTX库实现了打开指定串口、设置串口参数、获取输入输出流、发送数据和接收数据的功能。你可以根据实际情况修改代码中的串口号和波特率。
- 使用USB库:如果要连接的硬件设备是通过USB接口与计算机连接的,可以使用Java的USB库来实现与硬件的通信。常用的Java USB库有javax.usb和usb4java。可以使用这些库来检测和连接USB设备,并与其进行通信。
以下是使用usb4java库来实现USB通信的示例代码:
import org.usb4java.*;

import java.nio.ByteBuffer;

public class USBCommunicationExample {
    public static void main(String[] args) {
        Context context = null;
        DeviceHandle handle = null;

        try {
            // Initialize the USB context
            context = new Context();
            LibUsb.init(context);

            // Find the USB device
            DeviceList list = new DeviceList();
            int result = LibUsb.getDeviceList(context, list);
            if (result < 0) {
                throw new LibUsbException("Unable to get device list", result);
            }

            for (Device device : list) {
                DeviceDescriptor descriptor = new DeviceDescriptor();
                result = LibUsb.getDeviceDescriptor(device, descriptor);
                if (result < 0) {
                    throw new LibUsbException("Unable to read device descriptor", result);
                }

                // Check if the device matches your criteria
                if (descriptor.idVendor() == yourVendorId && descriptor.idProduct() == yourProductId) {
                    // Open the USB device
                    handle = new DeviceHandle();
                    result = LibUsb.open(device, handle);
                    if (result != LibUsb.SUCCESS) {
                        throw new LibUsbException("Unable to open USB device", result);
                    }

                    // Claim the USB interface
                    result = LibUsb.claimInterface(handle, yourInterfaceNumber);
                    if (result != LibUsb.SUCCESS) {
                        throw new LibUsbException("Unable to claim USB interface", result);
                    }

                    // Perform USB communication
                    ByteBuffer buffer = ByteBuffer.allocateDirect(yourBufferSize);
                    result = LibUsb.bulkTransfer(handle, yourEndpointAddress, buffer, yourTimeout);
                    if (result < 0) {
                        throw new LibUsbException("Unable to perform USB communication", result);
                    }

                    // Process the received data
                    byte[] data = new byte[result];
                    buffer.get(data);
                    System.out.println("Received data: " + new String(data));

                    // Release the USB interface and close the USB device
                    LibUsb.releaseInterface(handle, yourInterfaceNumber);
                    LibUsb.close(handle);
                }
            }

            // Free the device list
            LibUsb.freeDeviceList(list, true);
        } catch (LibUsbException e) {
            e.printStackTrace();
        } finally {
            // Deinitialize the USB context
            if (handle != null && LibUsb.hasCapability(LibUsb.CAP_HAS_RELEASE_INTERFACE)) {
                LibUsb.releaseInterface(handle, yourInterfaceNumber);
            }
            if (handle != null) {
                LibUsb.close(handle);
            }
            if (context != null) {
                LibUsb.exit(context);
            }
        }
    }
}
上述代码使用usb4java库实现了检测和连接指定的USB设备、进行USB通信的功能。你需要根据实际情况修改代码中的供应商ID、产品ID