关于算数转换成Python语言
刚学Python,基础的都还没怎么搞懂,有人晓得下面这些算式怎么转换成Python语言吗?稍微举个例子讲一讲就好
参考网络搜索的链接,依据题目式子,使用python自带的各库函数即可实现题目所求。
代码如下(仅供参考):
参考链接:
https://blog.csdn.net/Kzy__224/article/details/126598417
https://www.python51.com/jc/11947.html
https://jingyan.baidu.com/article/22a299b53396bbdf18376a7a.html
https://blog.csdn.net/weixin_52026996/article/details/115307239
https://baijiahao.baidu.com/s?id=1739557155390240365&wfr=spider&for=pc
import math
import numpy as np
x=12
y=10E-5
# https://blog.csdn.net/qq_51646682/article/details/127548778
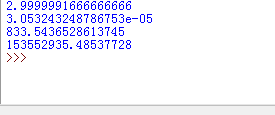
s1 = 1+x/math.factorial(3)-y/ math.factorial(5)
# https://blog.csdn.net/Kzy__224/article/details/126598417
# https://www.python51.com/jc/11947.html
# https://jingyan.baidu.com/article/22a299b53396bbdf18376a7a.html
s2 = 2*np.log(math.fabs(x-y))/(math.exp(x+y)-math.tan(y))
# https://blog.csdn.net/weixin_52026996/article/details/115307239
s3 = (math.sin(x)+math.cos(y))/(x*x+y*y)+ math.pow(x,y)/(x*y)
# https://baijiahao.baidu.com/s?id=1739557155390240365&wfr=spider&for=pc
s4 = math.exp(math.pi/2*x)+ math.log10(math.fabs(x-y))/(x+y)
print(s1)
print(s2)
print(s3)
print(s4)
阶乘、对数、三角函数,都可以使用math模块内置的函数实现
from math import *

def fun1(x, y):
    return 1 + x/factorial(3) - y/factorial(5)

def fun2(x, y):
    return 2*log(abs(x-y)) / (pow(e,x+y)-tan(y))

def fun3(x, y):
    return (sin(x)+cos(y)) / (pow(x,2)+pow(y,2)) + pow(x,y)/(x*y)

def fun4(x, y):
    return pow(e, pi/2*x) + log(abs(x-y))/(x+y)

x = 12
y = float("1e-5")
print(fun1(x,y))
print(fun2(x,y))
print(fun3(x,y))
print(fun4(x,y))
- 这个问题的回答你可以参考下: https://ask.csdn.net/questions/361578
- 这篇博客你也可以参考下:Python报错
- 除此之外, 这篇博客: [易懂]两连杆关节机械臂机器人给定位置求解各关节转动角度教程模拟Python实现中的 鼠标选定屏幕上一点,然后求逆解进行运动Python实现代码 部分也许能够解决你的问题, 你可以仔细阅读以下内容或跳转源博客中阅读:
下面是效果图,打开你的编辑器跟着我写的代码实践吧,你的赞和关注是我持续分享的动力。
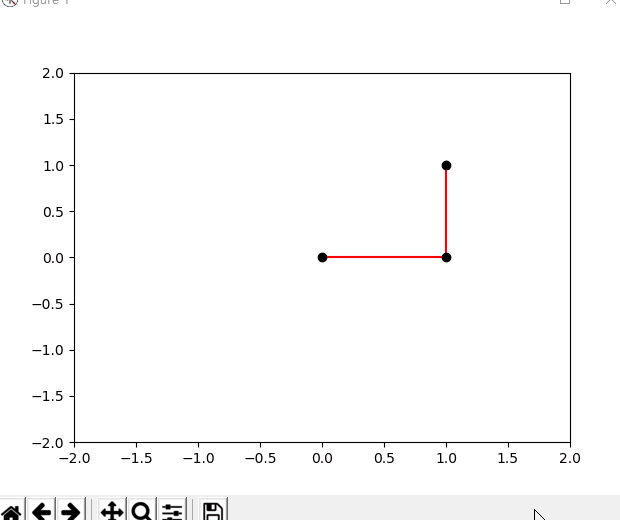
"""
@author 李韬——知乎@Ai酱
教程地址:https://blog.csdn.net/varyshare/article/details/96885179
"""
import numpy as np
from numpy import cos, sin, arccos, arctan2, sqrt
import matplotlib.pyplot as plt

(target_x,target_y) = (1,1) # 机器人要到达的目标点
class TwoLinkArm:
    """
    两连杆手臂模拟。
    所使用的变量与模拟实体对应关系如下所示:
    (joint0)——连杆0——(joint1)——连杆1——[joint2]
    注意:joint0是基座也是坐标原点(0,0)
    """

    def __init__(self, _joint_angles=[0, 0]):
        # 第0个关节是基座所以坐标固定是原点(0,0)
        self.joint0 = np.array([0, 0])
        # 机器人两段连杆(手臂)的长度
        self.link_lengths = [1, 1]
        self.update_joints(_joint_angles)

    def update_joints(self, _joint_angles):
        self.joint_angles = _joint_angles
        self.forward_kinematics()

    def forward_kinematics(self):
        """
        根据各个关节角计算各个关节的位置.
        注意:所使用的变量与模拟实体对应关系如下所示:
        (joint0)——连杆0——(joint1)——连杆1——[joint2]
        """

        # 计算关节1的位置
        # q0,q1分别是第0和第1个关节的关节角
        q0 = self.joint_angles[0]
        a0 = self.link_lengths[0]
        self.joint1 = self.joint0 + [a0 * cos(q0), a0 * sin(q0)]
        # 计算关节2的位置
        q1 = self.joint_angles[1]
        a1 = self.link_lengths[1]
        # 注意:q1是杆1相对于杆0的延长线的转角,而杆0相对水平线的转角是q0
        # 所以杆1相对水平线的转角是(q0+q1), 而joint2是杆1的末端
        self.joint2 = self.joint1 + [a1 * cos(q0 + q1), a1 * sin(q0 + q1)]

    def plot(self):
        """
        绘制当前状态下的机械臂
        """

        # 清理坐标系中的内容
        plt.cla()

        # 三个关节的坐标
        x = [self.joint0[0], self.joint1[0], self.joint2[0]]
        y = [self.joint0[1], self.joint1[1], self.joint2[1]]
        # 绘制这样的一条线——连杆0————连杆1——
        plt.plot(x, y, c="red", zorder=1)
        # 绘制三个黑圆点代表关节,zorder=2是为了让绘制的点盖在直线上面
        plt.scatter(x, y, c="black", zorder=2)
        # 绘制目标点
        global target_x,target_y
        plt.scatter(target_x,target_y,c='blue',marker='*')
        # 固定住坐标系,
        # 不让它乱变,不让我点击的坐标和它显示的坐标不是一个坐标
        plt.xlim(-2, 2)
        plt.ylim(-2, 2)


    def inverse_kinematic(self, x, y):
        """
        逆运动学求解要达到(x,y)需要转动的角度,
        返回机器人各关节需要转动的角度
        """
        a0 = self.link_lengths[0]
        a1 = self.link_lengths[1]
        q1 = arccos((x ** 2 + y ** 2 - a0 ** 2 - a1 ** 2) / (2 * a0 * a1))
        q0 = arctan2(y, x) - arctan2(a1 * sin(q1), a1 * cos(q1) + a0)
        return [q0, q1]

    def animation(self,x,y):
        _joint_angles = self.inverse_kinematic(x, y)

        # 将这个角度变化过程分解成一个1s内的执行15步的慢动作
        duration_time_seconds = 1
        actions_num = 15
        angles_per_action = (np.array(_joint_angles) - np.array(self.joint_angles))/actions_num
        plt.ion() # 开启交互模式不然没有动画效果
        for action_i in range(actions_num):

            self.joint_angles = np.array(self.joint_angles) + angles_per_action
            self.update_joints(self.joint_angles)
            self.plot()
            dt = duration_time_seconds/actions_num
            plt.pause(dt)


    def to_mouse_posi(self,event):
        """
        鼠标点击事件处理函数:记录鼠标在坐标系中的位置(x,y)
        然后将其设置为机器人要到达的目标点
        """
        global target_x, target_y
        if event.xdata == None or event.ydata == None:
            print("请在坐标系内选择一个点")
            return
        target_x = event.xdata
        target_y = event.ydata
        self.animation(target_x,target_y)


# ---------------------------------
def main():
    fig = plt.figure()
    arm_robot = TwoLinkArm()
    arm_robot.animation(target_x,target_y)
    fig.canvas.mpl_connect("button_press_event", arm_robot.to_mouse_posi)
    plt.ioff() # 一定要终止交互模式不然会一闪而过
    plt.show()


if __name__ == "__main__":
    main()
    pass
参考文献:
[1] https://robotacademy.net.au/lesson/inverse-kinematics-for-a-2-joint-robot-arm-using-geometry/- 您还可以看一下 张日智老师的python安全开发/高级渗透技术课程中的 4.5 实战多线程爬取妹子图片上小节, 巩固相关知识点