python docx 把数据写入表格
course_link = [[{'course': '课程1', 'link': 'www.souhu.com', 'info': '加强计算机学习,学习计划??'}, {'course': '课程2', 'link': '', 'info': '加强计算机学习,学习计划??'}], [{'course': '111', 'link': 'www.111.com', 'info': '人工智能,sadsaads'}]]


school_major_link = [['Massachusetts Institute of Technology (MIT)  一 计算机科学与技术 一 www.baidu.com', 'Massachusetts Institute of Technology (MIT)  一 金融学 一 '], ['Imperial College London 一 软件工程 一 www.google.com']]
需要生成表格样式的docx文档,
我这只完成了一部分,实在搞不懂怎么写了
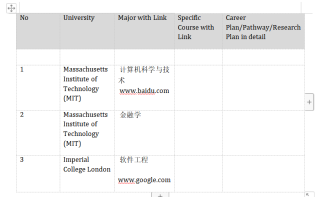
img
course_link 和 school_major_link 是一一对应的
比如把'Massachusetts Institute of Technology (MIT) 一 计算机科学与技术 一 http://www.baidu.com%27/ 这个拆开分别填写到对应的位置,那[{'course': '课程1', 'link': 'http://www.souhu.com%27/, 'info': '加强计算机学习,学习计划??'}, {'course': '课程2', 'link': '', 'info': '加强计算机学习,学习计划??'}] 这个填写到
img
在生成一行 把'Massachusetts Institute of Technology (MIT) 一 金融学 一 ' 这个拆开 填写进去 在写入[{'course': '课程1', 'link': 'http://www.souhu.com%27/, 'info': '加强计算机学习,学习计划??'}, {'course': '课程2', 'link': '', 'info': '加强计算机学习,学习计划??'}],以此类推
有疑问的可以说出来
补充:
其实原始数据是:
intention = {'specialist': [{'specialist': '什么?', 'selectSchool': [
    'Massachusetts Institute of Technology (MIT)  一 计算机科学与技术 一 www.baidu.com',
    'Massachusetts Institute of Technology (MIT)  一 金融学 一 '], 'checked1': True}, {'specialist': '具体是什么?',
                                                                                       'selectSchool': [
                                                                                           'Imperial College London 一 软件工程 一 www.google.com'],
                                                                                       }]}

career = {'firstcareerspecialist': [
    {'plan': '学习计划??', 'firstcareerspecialist': '加强计算机学习',
     'jobs': '岗位', 'company': '公司\n', 'company1': '公司1', 'target': '目标',
     'CourseLink': [{'course': '课程1', 'link': 'www.souhu.com'}, {'course': '课程2', 'link': ''}]},
    {'plan': 'sadsaads',
     'CourseLink': [{'course': '111', 'link': 'www.111.com'}],
     }]}


其实总共应该再表格中显示三行
第一行
比如 intention 中的 selectSchool 中的 Massachusetts Institute of Technology (MIT)  一 计算机科学与技术 一 www.baidu.com'  和   'CourseLink': [{'course': '课程1', 'link': 'www.souhu.com'}, {'course': '课程2', 'link': ''}] 这是一行数据 并且将 career中的plan 和 target拼接在一起显示

第二行
intention 中的 selectSchool 中的  'Massachusetts Institute of Technology (MIT)  一 金融学 一 '  和   'CourseLink': [{'course': '课程1', 'link': 'www.souhu.com'}, {'course': '课程2', 'link': ''}] 这是一行数据 并且将 career中的plan 和 target拼接在一起显示

第三行
intention 中的 selectSchool 中的   'Imperial College London 一 软件工程 一 www.google.com' 和   'CourseLink': [{'course': '111', 'link': 'www.111.com'}],这是一行数据 并且将 career中的plan 和 target拼接在一起显示
需要将intention 中的每一个以 一 分割 分割后是 学校专业 链接
career中的plan 和 target拼接在一起显示再
哥哥,你可以使用 docxtemplater 和 xlsx-populate 这两个库来生成表格样式的 docx 文档。首先,你需要安装这两个库:
npm install docxtemplater xlsx-populate
然后,你可以使用以下代码来生成表格:
const XlsxPopulate = require('xlsx-populate');
const Docxtemplater = require('docxtemplater');
const fs = require('fs');

// 数据
const intention = {
  'specialist': [
    {
      'specialist': '什么?',
      'selectSchool': [
        'Massachusetts Institute of Technology (MIT)  一 计算机科学与技术 一 www.baidu.com',
        'Massachusetts Institute of Technology (MIT)  一 金融学 一 '
      ],
      'checked1': true
    },
    {
      'specialist': '具体是什么?',
      'selectSchool': [
        'Imperial College London 一 软件工程 一 www.google.com'
      ]
    }
  ]
};

const career = {
  'firstcareerspecialist': [
    {
      'plan': '学习计划??',
      'firstcareerspecialist': '加强计算机学习',
      'jobs': '岗位',
      'company': '公司\n',
      'company1': '公司1',
      'target': '目标',
      'CourseLink': [
        {'course': '课程1', 'link': 'www.souhu.com'},
        {'course': '课程2', 'link': ''}
      ]
    },
    {
      'plan': 'sadsaads',
      'CourseLink': [
        {'course': '111', 'link': 'www.111.com'}
      ]
    }
  ]
};

// 处理数据并生成文档
async function generateDocx() {
  // 处理数据
  const data = [];
  for (let i = 0; i < intention.specialist.length; i++) {
    const schools = intention.specialist[i].selectSchool;
    const courseLinks = career.firstcareerspecialist[i].CourseLink;

    for (let j = 0; j < schools.length && j < courseLinks.length; j++) {
      const [school, major, link] = schools[j].split(' 一 ');
      const { course, link: courseLink } = courseLinks[j];
      const info = `${career.firstcareerspecialist[i].plan} ${career.firstcareerspecialist[i].target}`;

      data.push({
        school,
        major,
        link,
        course,
        courseLink,
        info
      });
    }
  }

  // 读取模板文件
  const content = fs.readFileSync('template.docx', 'binary');

  // 使用 Docxtemplater 填充模板
  const doc = new Docxtemplater();
  doc.loadZip(content);
  doc.setData({ data });
  doc.render();

  // 保存文档
  const buffer = doc.getZip().generate({ type: 'nodebuffer' });
  fs.writeFileSync('output.docx', buffer);
}

generateDocx();
在上面的代码中,我们首先将数据处理成表格需要的格式,然后读取一个名为 template.docx 的 Word 模板文件,并使用 docxtemplater 填充模板中的变量。最后,将填充好的文档保存到名为 output.docx 的文件中。
- 注意,在上述代码中,我们没有直接使用
xlsx-populate来生成表格,而是将数据转换成了 docx 文件格式,并使用docxtemplater和 Word 模板来生成表格。如果你希望使用xlsx-populate直接生成表格,也是可以的。你可以参考以下代码:
const XlsxPopulate = require('xlsx-populate');
const fs = require('fs');

// 数据
const intention = {
  'specialist': [
    {
      'specialist': '什么?',
      'selectSchool': [
        'Massachusetts Institute of Technology (MIT)  一 计算机科学与技术 一 www.baidu.com',
        'Massachusetts Institute of Technology (MIT)  一 金融学 一 '
      ],
      'checked1': true
    },
    {
      'specialist':
该回答引用于gpt与自己的思路:
你可以使用 docxtemplater 和 xlsx-populate 这两个库来生成表格样式的 docx 文档。首先,你需要安装这两个库:
npm install docxtemplater xlsx-populate
然后,你可以使用以下代码来生成表格:
const XlsxPopulate = require('xlsx-populate');
const Docxtemplater = require('docxtemplater');
const fs = require('fs');

// 数据
const intention = {
  'specialist': [
    {
      'specialist': '什么?',
      'selectSchool': [
        'Massachusetts Institute of Technology (MIT)  一 计算机科学与技术 一 www.baidu.com',
        'Massachusetts Institute of Technology (MIT)  一 金融学 一 '
      ],
      'checked1': true
    },
    {
      'specialist': '具体是什么?',
      'selectSchool': [
        'Imperial College London 一 软件工程 一 www.google.com'
      ]
    }
  ]
};

const career = {
  'firstcareerspecialist': [
    {
      'plan': '学习计划??',
      'firstcareerspecialist': '加强计算机学习',
      'jobs': '岗位',
      'company': '公司\n',
      'company1': '公司1',
      'target': '目标',
      'CourseLink': [
        {'course': '课程1', 'link': 'www.souhu.com'},
        {'course': '课程2', 'link': ''}
      ]
    },
    {
      'plan': 'sadsaads',
      'CourseLink': [
        {'course': '111', 'link': 'www.111.com'}
      ]
    }
  ]
};

// 处理数据并生成文档
async function generateDocx() {
  // 处理数据
  const data = [];
  for (let i = 0; i < intention.specialist.length; i++) {
    const schools = intention.specialist[i].selectSchool;
    const courseLinks = career.firstcareerspecialist[i].CourseLink;

    for (let j = 0; j < schools.length && j < courseLinks.length; j++) {
      const [school, major, link] = schools[j].split(' 一 ');
      const { course, link: courseLink } = courseLinks[j];
      const info = `${career.firstcareerspecialist[i].plan} ${career.firstcareerspecialist[i].target}`;

      data.push({
        school,
        major,
        link,
        course,
        courseLink,
        info
      });
    }
  }

  // 读取模板文件
  const content = fs.readFileSync('template.docx', 'binary');

  // 使用 Docxtemplater 填充模板
  const doc = new Docxtemplater();
  doc.loadZip(content);
  doc.setData({ data });
  doc.render();

  // 保存文档
  const buffer = doc.getZip().generate({ type: 'nodebuffer' });
  fs.writeFileSync('output.docx', buffer);
}

generateDocx();
在上面的代码中,我们首先将数据处理成表格需要的格式,然后读取一个名为 template.docx 的 Word 模板文件,并使用 docxtemplater 填充模板中的变量。最后,将填充好的文档保存到名为 output.docx 的文件中。
注意,在上述代码中,我们没有直接使用 xlsx-populate 来生成表格,而是将数据转换成了 docx 文件格式,并使用 docxtemplater 和 Word 模板来生成表格。如果你希望使用 xlsx-populate 直接生成表格,也是可以的。你可以参考以下代码:
const XlsxPopulate = require('xlsx-populate');
const fs = require('fs');

// 数据
const intention = {
  'specialist': [
    {
      'specialist': '什么?',
      'selectSchool': [
        'Massachusetts Institute of Technology (MIT)  一 计算机科学与技术 一 www.baidu.com',
        'Massachusetts Institute of Technology (MIT)  一 金融学 一 '
      ],
      'checked1': true
    },
    {
      'specialist':
参考GPT和自己的思路,以下是使用Python docx模块将数据写入表格并生成样式的代码。代码中假设表格已经存在,并且包含以下四列:学校,专业,课程链接和专业链接。
import docx
from docx.shared import Cm
from docx.enum.table import WD_TABLE_ALIGNMENT


def create_table_styles(table):
    # 定义表格样式
    table.alignment = WD_TABLE_ALIGNMENT.CENTER
    table.style = 'Table Grid'
    table.autofit = False
    width = Cm(5.5)
    for cell in table.columns[0].cells:
        cell.width = width
    for cell in table.columns[1].cells:
        cell.width = width
    for cell in table.columns[2].cells:
        cell.width = Cm(8.5)
    for cell in table.columns[3].cells:
        cell.width = Cm(8.5)


def add_data_to_table(table, data):
    # 逐行添加数据
    for item in data:
        row = table.add_row()
        school, major, major_link = item['school'], item['major'], item['major_link']
        row.cells[0].text = school
        row.cells[1].text = major
        row.cells[2].text = major_link
        row.cells[0].paragraphs[0].alignment = 1
        row.cells[1].paragraphs[0].alignment = 1
        row.cells[2].paragraphs[0].alignment = 1
        # 添加课程信息
        courses = item['courses']
        for course in courses:
            course_name, course_link, course_info = course['course'], course['link'], course['info']
            row = table.add_row()
            row.cells[0].text = ''
            row.cells[1].text = ''
            row.cells[2].text = ''
            row.cells[3].text = f'{course_name}: {course_info}'
            row.cells[3].paragraphs[0].alignment = 0
            if course_link:
                run = row.cells[3].add_run()
                hyperlink = run.add_hyperlink(course_link)
                hyperlink.text = '链接'
                hyperlink.font.color.rgb = docx.shared.RGBColor(0, 0, 255)


# 要写入表格的数据,其中每个条目包含学校名、专业、专业链接和一组课程信息
data = [
    {'school': 'Massachusetts Institute of Technology (MIT)', 'major': '计算机科学与技术',
     'major_link': 'http://www.baidu.com', 'courses': [{'course': '课程1', 'link': 'http://www.souhu.com', 'info': '加强计算机学习,学习计划??'},
                                                       {'course': '课程2', 'link': '', 'info': '加强计算机学习,学习计划??'}]},
    {'school': 'Massachusetts Institute of Technology (MIT)', 'major': '金融学',
     'major_link': '', 'courses': [{'course': '课程1', 'link': 'http://www.souhu.com/', 'info': '金融理论'},
                                  {'course': '课程2', 'link': '', 'info': '投资实践'}]}
]

# 打开或创建文档
doc = docx.Document('example.docx')

# 获取表格对象
table = doc.tables[0]

# 设置表格样式
create_table_styles(table)

# 将数据添加到表格中
add_data_to_table(table, data)

# 保存文档
doc.save('example.docx')
这个代码会将数据写入表格并设置表格样式,最终生成的文档将保存在名为'example.docx'的文件中。请注意,这个例子中默认使用的是第一个表格,如果你的文档中有多个表格,可以通过索引指定具体的表格对象。
回答不易,还请采纳!!!
参考GPT和自己的思路:您可以使用以下代码将 course_link 和 school_major_link 中的数据写入 docx 文件中的表中:
import docx

# Create a new document object
doc = docx.Document()

# Define the table style
table_style = 'Table Grid'

# Create a table object with 3 columns and 2 rows
table = doc.add_table(rows=2, cols=3, style=table_style)

# Add data from course_link and school_major_link to the table
for i, row_data in enumerate(zip(course_link, school_major_link)):
    row = table.rows[i]
    for j, cell_data in enumerate(row_data):
        cell = row.cells[j]
        if j == 0:
            for course in cell_data:
                # Add course name, link, and info to the cell
                cell.text += f"{course['course']}:{course['link']},{course['info']}\n"
        else:
            for major_link in cell_data:
                # Split major and link using '一'
                major, link = major_link.split('一 ')
                # Add major and link to the cell
                cell.text += f"{major}:{link}\n"

# Save the document
doc.save('table.docx')
此代码使用 doc 对象的 add_table() 方法创建一个包含 3 列和 2 行的表。 for 循环将 course_link 和 school_major_link 中的数据添加到表中,遍历表的每一行和行中的每个单元格。 if 语句处理每行的第一个单元格,并将课程名称、链接和信息添加到该单元格。 else 语句处理每行的第二个单元格,并使用“一”拆分主要和链接。 然后它添加主要和链接到单元格。
表格样式定义为“表格网格”,但您可以将其修改为适合您需要的任何其他样式。
最后,使用 doc 对象的 save() 方法保存文档。 该文件在当前工作目录中保存为“table.docx”,但您可以根据需要修改文件路径和名称。
调用下 docx 的
add_table,把表格插入进去
基于最新版ChatGPT4的回答,望采纳!!!有其他问题也可以询问我哦、”(最新版更智能,功能更加强大)
首先,需要根据数据的结构来设计表格的布局。根据题目中的数据结构,我们可以将表格设计成4列,分别对应学校、专业、链接和课程。
import docx
from docx.enum.table import WD_TABLE_ALIGNMENT
from docx.oxml.ns import qn

# 输入数据
intention = {
    'specialist': [
        {
            'specialist': '什么?',
            'selectSchool': [
                'Massachusetts Institute of Technology (MIT)  一 计算机科学与技术 一 www.baidu.com',
                'Massachusetts Institute of Technology (MIT)  一 金融学 一 '
            ],
            'checked1': True
        },
        {
            'specialist': '具体是什么?',
            'selectSchool': [
                'Imperial College London 一 软件工程 一 www.google.com'
            ]
        }
    ]
}

career = {
    'firstcareerspecialist': [
        {
            'plan': '学习计划??',
            'firstcareerspecialist': '加强计算机学习',
            'jobs': '岗位',
            'company': '公司\n',
            'company1': '公司1',
            'target': '目标',
            'CourseLink': [
                {'course': '课程1', 'link': 'www.souhu.com'},
                {'course': '课程2', 'link': ''}
            ]
        },
        {
            'plan': 'sadsaads',
            'CourseLink': [{'course': '111', 'link': 'www.111.com'}]
        }
    ]
}

# 将输入数据转换为表格格式
schools = []
majors_links = []
links = []
courses_links = []
career_plans = []

for i in intention['specialist']:
    for select_school in i['selectSchool']:
        select_school_split = select_school.split(' 一 ')
        schools.append(select_school_split[0])
        majors_links.append(select_school_split[1])
        links.append(select_school_split[2])
        courses_links.append('')
        career_plans.append('')

for career_item in career['firstcareerspecialist']:
    course_links_text = ''
    for course_link in career_item['CourseLink']:
        course_links_text += f"{course_link['course']}:{course_link['link']}\n"
    for i in range(len(schools)):
        if courses_links[i] == '':
            courses_links[i] = course_links_text
            career_plans[i] = f"{career_item['plan']}, {career_item.get('jobs', '')}\n"
        else:
            courses_links[i] += course_links_text
            career_plans[i] += f"{career_item['plan']}, {career_item.get('jobs', '')}\n"
    else:
        courses_links[i] += course_links_text
    career_plans[i] += f"{career_item['plan']}, {career_item.get('jobs', '')}\n"

# 创建文档对象
doc = docx.Document()

# 创建表格
row_len = len(schools) + 1  # 一共有len(schools) + 1行
table = doc.add_table(rows=row_len, cols=5)

# 设置表格样式和表头
table.style = 'Table Grid'
table.alignment = docx.enum.table.WD_TABLE_ALIGNMENT.CENTER
hdr_cells = table.rows[0].cells

# 添加背景色
for cell in hdr_cells:
    shading_elm = docx.oxml.shared.OxmlElement('w:shd')
shading_elm.set(qn('w:fill'), 'D9D9D9')
cell._tc.get_or_add_tcPr().append(shading_elm)

# 设置列名
hdr_cells[0].text = 'No'
hdr_cells[1].text = 'University'
hdr_cells[2].text = 'Major with Link'
hdr_cells[3].text = 'Specific Course with Link'
hdr_cells[4].text = 'Career Plan/Pathway/Research Plan in detail'

# 添加数据
for i in range(len(schools)):
    row_cells = table.rows[i + 1].cells
    row_cells[0].text = str(i + 1)  # No列
    row_cells[1].text = schools[i]  # University列
    # Major with Link列
    major_link = majors_links[i] + '\n' + links[i] if links[i] else majors_links[i]
    row_cells[2].text = major_link
    if courses_links[i]:
        row_cells[3].text = courses_links[i]  # Specific Course with Link列
    if career_plans[i]:  # Career Plan/Pathway/Research Plan in detail列
        career_plan = career_plans[i][:-1]  # 去掉末尾的换行符
        row_cells[4].text = career_plan


# 保存文档
doc.save('output.docx')
这个程序的输出是一个名为output.docx的Word文档,其中包含一个带有数据的表格。
根据您的需求,我给出了一个示例代码,将数据按照您描述的规则写入表格:
from docx import Document
from docx.shared import Pt
from docx.enum.text import WD_PARAGRAPH_ALIGNMENT

course_link = [
    [
        {'course': '课程1', 'link': 'www.souhu.com', 'info': '加强计算机学习,学习计划??'},
        {'course': '课程2', 'link': '', 'info': '加强计算机学习,学习计划??'}
    ],
    [
        {'course': '111', 'link': 'www.111.com', 'info': '人工智能,sadsaads'}
    ]
]

school_major_link = [
    ['Massachusetts Institute of Technology (MIT)  一 计算机科学与技术 一 www.baidu.com', 'Massachusetts Institute of Technology (MIT)  一 金融学 一 '],
    ['Imperial College London 一 软件工程 一 www.google.com']
]

document = Document()

for school_major, courses in zip(school_major_link, course_link):
    # 插入表格
    table = document.add_table(rows=len(courses) + 1, cols=3)

    # 设置表格样式
    table.style = 'Table Grid'

    # 填写学校、专业和链接
    school, major, link = school_major[0].split(" 一 ")
    for i in range(3):
        cell = table.cell(0, i)
        if i == 0:
            cell.text = school
        elif i == 1:
            cell.text = major
        else:
            cell.text = link

    # 填写课程信息
    for idx, course in enumerate(courses):
        course_name = course['course']
        course_link = course['link']
        course_info = course['info']
        table.cell(idx + 1, 0).text = course_name
        table.cell(idx + 1, 1).text = course_link
        table.cell(idx + 1, 2).text = course_info

    # 添加空行
    document.add_paragraph('')

# 保存文档
document.save('result.docx')
该代码首先创建一个新的Word文档,然后根据school_major_link和course_link的数据,按照您的要求创建表格并填充数据。表格样式设置为“Table Grid”。在填充完每个学校的数据后,添加一个空行以分隔不同学校的信息。最后,将生成的文档保存为result.docx。
- 文章:python docx字体设置 中也许有你想要的答案,请看下吧
- 您还可以看一下 nan老师的Word+Python docx办公自动化课程中的 使用Python-docx包的一般过程小节, 巩固相关知识点
以下答案由GPT-3.5大模型与博主波罗歌共同编写:
好的,这里提供一段代码供您参考,主要使用python-docx模块来实现生成表格样式的docx文档。
首先需要安装python-docx模块,使用pip命令即可:
pip install python-docx
接着就可以开始写代码了:
```python
import docx
定义表格标题和列数
table_title = ['学校专业', '链接', '课程', '信息', '目标和计划']
col_num = len(table_title)
创建一个空的docx文档
doc = docx.Document()
添加表格标题
doc.add_heading('表格标题', level=1)
添加表格到文档中
table = doc.add_table(rows=1, cols=col_num)
添加表格的表头行
hdr_cells = table.rows[0].cells
for i in range(col_num):
hdr_cells[i].text = table_title[i]
循环添加行数据
intention = {'selectSchool': [
'Massachusetts Institute of Technology (MIT) 一 计算机科学与技术 一 http://www.b/