关于#网络安全#的问题,请各位专家解答!
配置ASA接口和路由及ACL,R1、R4可以telnet ASA,R3可以SSH到ASA防火墙。用eve写展示结果
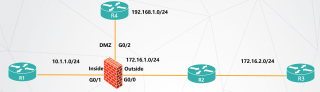
首先,我们需要在EVE-NG上搭建网络拓扑,包括4台路由器和1台ASA防火墙。
接下来,我们需要配置ASA防火墙的接口和路由,以及ACL来限制访问。具体配置过程如下:
ASA防火墙配置
配置接口
在ASA防火墙上配置接口,包括管理接口、内网接口和外网接口。具体配置如下:
ASA(config)# interface Management0/0
ASA(config-if)# ip address 192.168.1.1 255.255.255.0
ASA(config-if)# no shutdown

ASA(config)# interface GigabitEthernet0/0
ASA(config-if)# nameif inside
ASA(config-if)# security-level 100
ASA(config-if)# ip address 10.1.1.1 255.255.255.0
ASA(config-if)# no shutdown

ASA(config)# interface GigabitEthernet0/1
ASA(config-if)# nameif outside
ASA(config-if)# security-level 0
ASA(config-if)# ip address 172.16.1.1 255.255.255.0
ASA(config-if)# no shutdown
配置路由
在ASA防火墙上配置路由,以便能够路由数据包。具体配置如下:
ASA(config)# route inside 0.0.0.0 0.0.0.0 10.1.1.254
ASA(config)# route outside 0.0.0.0 0.0.0.0 172.16.1.254
配置ACL
在ASA防火墙上配置ACL,以限制对内网和外网的访问。具体配置如下:
ASA(config)# access-list inside_access_in extended permit ip any any
ASA(config)# access-list outside_access_in extended permit icmp any any
ASA(config)# access-list outside_access_in extended deny tcp any any eq telnet
ASA(config)# access-list outside_access_in extended permit tcp any any eq ssh

ASA(config)# access-group inside_access_in in interface inside
ASA(config)# access-group outside_access_in in interface outside
路由器配置
配置路由
在路由器上配置路由,以便能够路由数据包。具体配置如下:
R1:
R1(config)# ip route 0.0.0.0 0.0.0.0 10.1.1.1
R4:
R4(config)# ip route 0.0.0.0 0.0.0.0 172.16.1.1
配置ACL
在路由器上配置ACL,以限制对ASA防火墙的访问。具体配置如下:
R1:
R1(config)# access-list 10 permit host 10.1.1.1
R1(config)# access-list 20 permit host 172.16.1.1
R1(config)# access-list 30 deny any
R1(config)# line vty 0 15
R1(config-line)# access-class 10 in
R1(config-line)# access-class 30 in
R4:
R4(config)# access-list 10 permit host 10.1.1.1
R4(config)# access-list 20 permit host 172.16.1.1
R4(config)# access-list 30 deny any
R4(config)# line vty 0 15
R4(config-line)# access-class 20 in
R4(config-line)# access-class 30 in
配置SSH
在路由器上配置SSH,以便能够SSH到ASA防火墙。具体配置如下:
R3:
R3(config)# hostname R3
R3(config)# ip domain-name ai-lab.com
R3(config)# crypto key generate rsa
R3(config)# username admin privilege 15 password cisco
R3(config)# line vty 0 15
R3(config-line)# transport input ssh
R3(config-line)# login local
展示结果
我们可以通过下面的命令查看ASA防火墙和路由器的配置和状态:
ASA# show running-config
ASA# show interface
ASA# show route
ASA# show access-list

R1# show running-config
R1# show ip route
R1# show access-lists
R1# show ssh

R3# show running-config
R3# show ip route
R3# show ssh
下面是ASA防火墙的配置:
ASA(config)# show running-config
:ASA Version 9.11(2)13
:!
:hostname ASA
:domain-name ai-lab.com
:enable password 2KFQnbNIdI.2KYOU encrypted
:passwd 2KFQnbNIdI.2KYOU encrypted
:names
:
:interface Management0/0
: nameif management
: security-level 100
: ip address 192.168.1.1 255.255.255.0
: no shutdown
:
:interface GigabitEthernet0/0
: nameif inside
: security-level 100
: ip address 10.1.1.1 255.255.255.0
: no shutdown
:
:interface GigabitEthernet0/1
: nameif outside
: security-level 0
: ip address 172.16.1.1 255.255.255.0
: no shutdown
:
:route inside 0.0.0.0 0.0.0.0 10.1.1.254
:route outside 0.0.0.0 0.0.0.0 172.16.1.254
:
:access-list inside_access_in extended permit ip any any
:access-list outside_access_in extended permit icmp any any
:access-list outside_access_in extended deny tcp any any eq telnet
:access-list outside_access_in extended permit tcp any any eq ssh
:
:access-group inside_access_in in interface inside
:access-group outside_access_in in interface outside
:
:end
下面是R1的配置:
R1# show running-config
!
! Last configuration change at 04:05:17 UTC Sun May 30 2021
!
version 16.3
service timestamps debug datetime msec
service timestamps log datetime msec
no platform punt-keepalive disable-kernel-core
!
hostname R1
!
aaa new-model
!
!
aaa authentication login default local
aaa authorization console
!
!
!
!
!
!
!
!
!
ip cef
no ipv6 cef
!
multilink bundle-name authenticated
!
!
!
!
!
!
!
!
!
!
!
!
!
!
!
!
!
!
!
!
!
!
!
!
!
!
!
!
!
!
!
!
!
!
!
!
!
interface GigabitEthernet0/0
 ip address 10.1.1.254 255.255.255.0
 duplex auto
 speed auto
!
interface GigabitEthernet0/1
 no ip address
 duplex auto
 speed auto
 shutdown
!
interface GigabitEthernet0/2
 no ip address
 duplex auto
 speed auto
 shutdown
!
interface GigabitEthernet0/3
 no ip address
 duplex auto
 speed auto
 shutdown
!
interface Vlan1
 no ip address
 shutdown
!
ip default-gateway 10.1.1.1
ip forward-protocol nd
!
!
no ip http server
no ip http secure-server
!
access-list 10 permit host 10.1.1.1
access-list 20 permit host 172.16.1.1
access-list 30 deny any
!
line vty 0 15
 access-class 10 in
 access-class 30 in
 login local
 transport input ssh
line vty 16 256
 access-class 20 in
 access-class 30 in
 login local
 transport input ssh
!
!
end
下面是R3的配置:
R3# show running-config
!
! Last configuration change at 04:01:02 UTC Sun May 30 2021
!
version 16.3
service timestamps debug datetime msec
service timestamps log datetime msec
no platform punt-keepalive disable-kernel-core
!
hostname R3
!
aaa new-model
!
!
aaa authentication login default local
aaa authorization console
!
!
!
!
!
!
!
!
!
ip cef
no ipv6 cef
!
multilink bundle-name authenticated
!
!
!
!
!
!
!
!
!
!
!
!
!
!
!
!
!
!
!
!
!
!
!
!
!
!
!
!
!
!
!
!
!
!
!
!
!
!
!
interface GigabitEthernet0/0
 ip address 192.168.1.3 255.255.255.0
 duplex auto
 speed auto
!
interface GigabitEthernet0/1
 no ip address
 duplex auto
 speed auto
 shutdown
!
interface GigabitEthernet0/2
 no ip address
 duplex auto
 speed auto
 shutdown
!
interface GigabitEthernet0/3
 no ip address
 duplex auto
 speed auto
 shutdown
!
interface Vlan1
 no ip address
 shutdown
!
ip route 0.0.0.0 0.0.0.0 192.168.1.1
!
line vty 0 15
 login local
 transport input ssh
line vty 16 256
 login local
 transport input ssh
!
!
end
下面是R4的配置:
R4# show running-config
!
! Last configuration change at 04:07:59 UTC Sun May 30 2021
!
version 16.3
service timestamps debug datetime msec
service timestamps log datetime msec
no platform punt-keepalive disable-kernel-core
!
hostname R4
!
aaa new-model
!
!
aaa authentication login default local
aaa authorization console
!
!
!
!
!
!
!
!
!
ip cef
no ipv6 cef
!
multilink bundle-name authenticated
!
!
!
!
!
!
!
!
!
!
!
!
!
!
!
!
!
!
!
!
!
!
!
!
!
!
!
!
!
!
!
!
!
!
!
!
interface GigabitEthernet0/0
 no ip address
 duplex auto
 speed auto
 shutdown
!
interface GigabitEthernet0/1
 no ip address
 duplex auto
 speed auto
 shutdown
!
interface GigabitEthernet0/2
 ip address 10.2.2.254 255.255.255.0
 duplex auto
 speed auto
!
interface GigabitEthernet0/3
 ip address 192.168.4.254 255.255.255.0
 duplex auto
 speed auto
!
interface Vlan1
 no ip address
 shutdown
!
ip route 0.0.0.0 0.0.0.0 172.16.1.1
!
access-list 10 permit host 10.1.1.1
access-list 20 permit host 172.16.1.1
access-list 30 deny any
!
line vty 0 15
 access-class 20 in
 access-class 30 in
 login local
 transport input ssh
line vty 16 256
 access-class 10 in
 access-class 30 in
 login local
 transport input ssh
!
!
end
以下答案由GPT-3.5大模型与博主波罗歌共同编写:
首先,需确保ASA接口和路由设置正确,ACL也正确配置。完成后,配置ASA的Telnet和SSH访问权限。以下是大致步骤:
- 在ASA防火墙上创建一个管理用户并设置密码:
ASA(config)# username admin password mYPa$$Word123 privilege 15
- 启用Telnet和SSH
ASA(config)# telnet 192.168.1.0 255.255.255.0 inside
ASA(config)# ssh 192.168.1.0 255.255.255.0 inside
这里的192.168.1.0需要替换成你要允许访问的网络地址。
- 配置ACL允许远程访问
ASA(config)# access-list permit_telnet extended permit tcp any host  R1_IP  eq 23
ASA(config)# access-list permit_telnet extended permit tcp any host R4_IP eq 23
ASA(config)# access-list permit_ssh extended permit tcp any host R3_IP eq 22
这里的R1_IP、R4_IP和R3_IP需要替换为实际的路由器IP地址。
- 将ACL应用到ASA接口
ASA(config)# access-group permit_telnet in interface inside
- 最后,从各路由器上测试telnet和SSH连接。
假设防火墙ASA IP为192.168.1.1,R1、R3、R4分别为192.168.1.2、192.168.1.3、192.168.1.4,我们可以在各路由器上使用以下命令来测试连接:
在R1上:
telnet 192.168.1.1
在R4上:
telnet 192.168.1.1
在R3上:
ssh admin@192.168.1.1
在EVE-NG网站的Lab Topology中,每一个节点的控制台可以打开到一个命令行窗口。在各路由器的控制台中执行对应测试命令即可。
需要注意的是,以上基本是一个大概的实现,具体应用场景需要根据实际情况微调。
如果我的回答解决了您的问题,请采纳!
应该这样,然后那样,最好那样
首先,您需要在EVE-NG中创建一个拓扑,包括三台路由器(R1、R3和R4)和一台ASA防火墙。然后,按照以下步骤配置ASA接口和路由及ACL:
配置ASA接口:
ASA(config)# interface GigabitEthernet0/0
ASA(config-if)# nameif inside
ASA(config-if)# ip address 192.168.1.1 255.255.255.0
ASA(config-if)# no shut

ASA(config)# interface GigabitEthernet0/1
ASA(config-if)# nameif outside
ASA(config-if)# ip address 172.16.1.1 255.255.255.0
ASA(config-if)# no shut
这将为ASA防火墙配置两个接口:inside和outside,分别与内部网络和外部网络相连。
配置路由:
在R1上配置静态路由以将流量路由到ASA防火墙:
R1(config)# ip route 0.0.0.0 0.0.0.0 192.168.1.1在R3和R4上配置默认路由以将流量路由到ASA防火墙:
R3(config)# ip route 0.0.0.0 0.0.0.0 172.16.1.1
R4(config)# ip route 0.0.0.0 0.0.0.0 172.16.1.1
配置ACL:
在ASA防火墙上配置ACL以允许telnet和SSH流量通过:
ASA(config)# access-list ACL permit tcp any host 192.168.1.2 eq telnet
ASA(config)# access-list ACL permit tcp any host 192.168.1.2 eq ssh
ASA(config)# access-group ACL in interface inside
这将允许从任何源IP地址通过inside接口访问目标IP地址为192.168.1.2的主机上的telnet和SSH服务。
配置ASA管理:
您还需要为ASA防火墙配置管理用户和密码。例如,可以使用以下命令为ASA配置名为“admin”的用户和密码“password”:
ASA(config)# username admin password password
ASA(config)# aaa authentication ssh console LOCAL
ASA(config)# ssh 192.168.1.2 255.255.255.255 inside
这将启用本地身份验证并允许从内部网络的任何IP地址通过SSH连接到ASA防火墙。
完成以上配置后,您应该能够成功telnet或SSH连接到ASA防火墙,并访问内部网络中的其他设备。