关于CNN图像识别模型
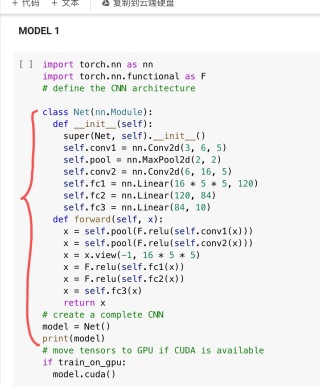
在数据集上训练一个基于cnn的二进制分类模型,对未见过的图像进行预测。导入数据是带有40个属性注释的图片,想利用图上Model1改写出符合的版本,但是无从下手希望大家指导,图二是已有的模版。
参考GPT和自己的思路:以下是针对您的需求对代码进行修改的版本:
import torch.nn as nn
import torch.nn.functional as F

# define the CNN architecture
class Net(nn.Module):
    def __init__(self):
        super(Net, self).__init__()
        self.conv1 = nn.Conv2d(3, 6, 5)
        self.pool = nn.MaxPool2d(2, 2)
        self.conv2 = nn.Conv2d(6, 16, 5)
        self.fc1 = nn.Linear(16 * 5 * 5, 120)
        self.fc2 = nn.Linear(120, 1)

    def forward(self, x):
        x = self.pool(F.relu(self.conv1(x)))
        x = self.pool(F.relu(self.conv2(x)))
        x = x.view(-1, 16 * 5 * 5)
        x = F.relu(self.fc1(x))
        x = torch.sigmoid(self.fc2(x))
        return x

# create a complete CNN
model = Net()
print(model)

# move tensors to GPU if CUDA is available
if train_on_gpu:
    model.cuda()
针对您的需求,我们对模型进行了以下修改:
1 输出层改为只有一个神经元,对二进制分类问题进行建模。
2 输出层激活函数改为sigmoid,将输出映射到[0, 1]的概率范围内。
3 fc3改为fc2,同时修改输出层维度为1,使得模型能够处理二进制分类问题。
请注意,在使用此修改后的模型进行训练和预测时,您需要根据自己的数据集对模型进行调整,例如修改输入图像的通道数,输出层的激活函数等等。同时,如果您要使用GPU进行训练,请确保将train_on_gpu设置为True。
“Devil组”引证GPT后的撰写:
- 首先,为了根据提供的图像属性注释训练基于CNN的二进制分类模型,需要准备数据集。可以使用Pandas库来读取注释文件,并将数据集加载到NumPy数组中。下一步是对数据集进行预处理,例如将像素值缩放到0到1之间,并将其转换为张量。最后,需要将数据集拆分为训练集和验证集。
- 然后,可以根据提供的模板使用PyTorch创建您的模型。需要更改模型的输入和输出大小以适应您的数据集。在此示例中,模型的输入大小为3(通道数)x图像高度x图像宽度,并且输出大小为1,因为这是一个二进制分类问题。
- 接下来,需要定义损失函数和优化器。在此示例中,使用交叉熵损失函数和随机梯度下降优化器。可以使用PyTorch中提供的其他损失函数和优化器来训练您的模型。
- 最后,需要编写一个训练循环来训练模型,并使用测试集评估模型的性能。在训练循环中,需要迭代训练数据集,计算模型的损失,并使用优化器更新模型的权重。在每个epoch结束时,可以使用验证集计算模型的准确性和损失,并在训练过程中记录这些值以进行后续分析和可视化分析。
- 这篇文章:经典CNN模型特点总结 也许有你想要的答案,你可以看看
以下答案由GPT-3.5大模型与博主波罗歌共同编写:
根据描述,在原有的代码基础上要进行修改以适应40个属性的数据,可以考虑以下步骤:
导入数据集并对其进行处理:读取图片,并将40个属性注释转换为与图像对应的标签。可以使用Python中的PIL库或OpenCV库来读取图像,使用pandas库或numpy库来处理注释数据。
数据预处理:对图像进行预处理,如归一化、尺寸调整、增强等操作,以提高模型的准确度。在这一步中,还需要将注释数据与图像数据进行合并,并将其划分为训练集和测试集。可以使用Keras库提供的ImageDataGenerator来进行数据增强操作。
3.设计CNN模型:该模型为二进制分类模型,因此可以选择常用的CNN结构的其中一种,如LeNet、AlexNet、VGG等,并对其进行适当改动以满足任务需求。在本例中,由于数据集相对较小,可以选择较小的模型结构。可以使用Keras搭建模型。
4.编译模型并训练模型:在训练模型前需要对模型进行编译,选择适当的损失函数、优化器和评估指标。在训练模型时,可以使用GPU加速训练,并使用early stopping等技巧防止过拟合。
- 模型预测:在训练结束后,使用模型对测试数据集进行预测,并计算出模型的准确率。
下面给出一个基于Keras的CNN图像分类代码示例,对于具体的数据集,需要进行一定的调整。
import keras
from keras.models import Sequential
from keras.layers import Dense, Dropout, Flatten, Conv2D, MaxPooling2D
from keras.preprocessing.image import ImageDataGenerator

# 导入数据集并进行处理
x_train, y_train = read_and_process_image(train_images, train_annotations)
x_test, y_test = read_and_process_image(test_images, test_annotations)

# 进行数据预处理
train_datagen = ImageDataGenerator(
    rescale=1./255,
    shear_range=0.2,
    zoom_range=0.2,
    horizontal_flip=True)
test_datagen = ImageDataGenerator(rescale=1./255)
train_generator = train_datagen.flow(x_train, y_train, batch_size=32)
validation_generator = test_datagen.flow(x_test, y_test, batch_size=32)

# 设计CNN模型
model = Sequential()
model.add(Conv2D(32, (3, 3), padding='same', activation='relu', input_shape=(img_width, img_height, 3)))
model.add(MaxPooling2D(pool_size=(2, 2)))
model.add(Conv2D(64, (3, 3), padding='same', activation='relu'))
model.add(MaxPooling2D(pool_size=(2, 2)))
model.add(Conv2D(128, (3, 3), padding='same', activation='relu'))
model.add(MaxPooling2D(pool_size=(2, 2)))
model.add(Flatten())
model.add(Dense(512, activation='relu'))
model.add(Dropout(0.5))
model.add(Dense(1, activation='sigmoid'))

# 编译模型并训练模型
model.compile(loss='binary_crossentropy', optimizer='rmsprop', metrics=['accuracy'])
model.fit_generator(
    train_generator,
    steps_per_epoch=len(x_train) // batch_size,
    epochs=epochs,
    validation_data=validation_generator,
    validation_steps=len(x_test) // batch_size,
    callbacks=[early_stopping])

# 模型预测
scores = model.evaluate(x_test, y_test, verbose=1)
print('Test loss:', scores[0])
print('Test accuracy:', scores[1])
如果我的回答解决了您的问题,请采纳!