选项卡加穿梭框的实现
问题遇到的现象和发生背景
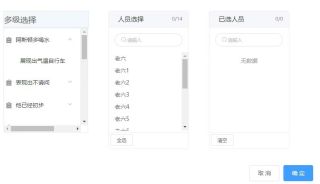
初入者,目前项目需要一个选项卡加穿梭框的功能,再一个弹出框里面,左边选项卡要有展开点击功能,点击后获取到index,然后根据index获取到后端数据,渲染到穿梭框左边,穿梭框不能使用按钮,只需要点击一下就可以把左边的数据转移到右边,(左边数据尽量不要消失还是在左边的框里面),右边显示数据后,鼠标移动到数据上要有删除按钮,可以删除掉,左边穿梭框需要一个全选按钮,右边要有一个清空按钮,最后需要将右边的所有值保存下来后需要获取数据,自己利用选项卡和element的transfer组件做了一个,但是重复点击会报错,而且点其他选项卡,会覆盖掉之前的数据。懵逼2天了,实在解决不了,最好使用VUE解决,可以用element组件
大概就是这个样子
可参考如下穿梭框进行:
<template>
  <div class="transfer-container">
    <div class="table-transfer">
      <el-row :gutter="24">
        <el-col :span="10" class="left">
          <div class="header">{{titles[0]}}</div>
          <div class="panel">
            <el-input placeholder="请输入内容" v-model="inputContent" clearable @input="handleInputChange" @clear="inputClear"> </el-input>
            <el-table ref="tableRef" :data="currentTableData" tooltip-effect="dark" style="width: 100%" @selection-change="handleSelectionChange" @row-click="handleRowClick">
              <el-table-column type="selection" width="40" :selectable="setSelectable"> </el-table-column>
              <el-table-column v-for="(item, index) in labelKey" :label="item.label" :prop="item.key" :width="item.width" :key="index" align="center"> </el-table-column>
            </el-table>
          </div>
        </el-col>
        <el-col :span="4" class="buttons">
          <el-button @click="selectChange" ref="selectbtn" :disabled="disabled">选择</el-button>
        </el-col>
        <el-col :span="10" class="right">
          <div class="header">{{titles[1]}}</div>
          <div class="panel">
            <ul>
              <li class="item" v-for="(item, index) in currentSelection" :key="index">
                <span>{{ item.name }}</span>
                <span>{{ item.no }}</span>
                <i class="el-icon-close" @click="deleteHandle(item)"></i>
              </li>
            </ul>
          </div>
        </el-col>
      </el-row>
    </div>
  </div>
</template>
<script>
// import specialList from './mock/specialist.json'

export default {
  props: {
    titles: {
      type: Array,
      default: function() {
        return ['', '']
      }
    },
    tableData: {
      type: Array
    },
    selectedData: {
      type: Array
    },
    labelKey: {
      type: Array
    },
    maxSelect: {
      type: Number
    }
  },
  model: {
    prop: 'selectedData',
    event: 'selectChange'
  },
  data() {
    return {
      inputContent: '',
      currentSelection: [],
      currentTableData: [],
      leftSelected: [],
      disabled: true, // 选择按钮默认值
      needSaveCheck: false // 是否需要保存左侧已选择状态
    }
  },
  methods: {
    createMockData() {
      // 随机成成数据
      let data = []
      let zm = ['aa', 'bb', '测试', 'cc', 'n', 'nib', 'speci01', 'p2', 'ccccc', '2021a', '2021b', '2021c', '2021jj', '2021333', 'ccc2021', '231546sss', '3654kkk', 'sssuy']
      for (let i = 0; i < 18; i++) {
        let special = {}
        special.name = zm[i]
        special.no = i + 'i'
        special.finished = Math.round(Math.random() * 100)
        special.unfinished = Math.round(Math.random() * 100)
        data.push(special)
      }
      // console.log(JSON.stringify(data))
    },
    selectChange() {
      // 点击选择按钮
      this.currentSelection = this.currentSelection.concat(this.leftSelected)
      this.currentTableData = this.tableData.filter(item => !this.currentSelection.some(citem => citem.no == item.no))
      this.leftSelected = []
      this.$emit('selectChange', this.currentSelection)
    },
    handleSelectionChange(selection) {
      if (this.needSaveCheck) {
        this.saveSelect()
      } else {
        this.leftSelected = selection
      }
      this.disabled = !(this.leftSelected.length > 0)
    },

    handleInputChange() {
      if (this.inputContent == '') {
        this.inputClear()
        return
      }
      const filterData = []
      const leftData = this.tableData.filter(item => !this.currentSelection.some(citem => citem.no == item.no))
      leftData.map(item => {
        if (item.no == this.inputContent || item.name.includes(this.inputContent)) {
          // 根据自己的搜索条件来判断
          filterData.push(item)
        }
      })
      this.currentTableData = filterData
      if (this.leftSelected.length > 0) {
        this.needSaveCheck = true
      }
    },
    inputClear() {
      this.currentTableData = this.tableData.filter(item => !this.currentSelection.some(citem => citem.no == item.no))
      if (this.leftSelected.length > 0) {
        this.needSaveCheck = true
        this.handleSelectionChange()
      }
    },
    setSelectable(row, index) {
      if (this.leftSelected.length + this.currentSelection.length >= this.maxSelect) {
        return this.leftSelected.findIndex(item => item.no == row.no) != -1
      }
      return true
    },
    deleteHandle(special) {
      this.currentSelection.splice(
        this.currentSelection.findIndex(item => item.no === special.no),
        1
      )
      this.currentTableData = this.tableData.filter(item => !this.currentSelection.some(citem => citem.no == item.no))
      this.handleInputChange()
    },
    handleRowClick(row) {
      const allSelectLength = this.leftSelected.length + this.currentSelection.length
      if (allSelectLength == this.maxSelect && this.leftSelected.findIndex(item => item.no === row.no) == -1) {
        return false
      }
      this.$refs.tableRef.toggleRowSelection(row)
    },
    saveSelect() {
      this.$nextTick(() => {
        this.currentTableData.map(item => {
          if (this.leftSelected.findIndex(lef => item.no == lef.no) !== -1) {
            this.$refs.tableRef.toggleRowSelection(item, true)
          }
        })
        this.needSaveCheck = false // 写在nextTick 方法里面很重要
      })
    }
  },
  mounted() {
    this.$nextTick(() => {
      this.currentTableData = this.tableData
    })
  }
}
</script>
<style lang="less" scope>
div {
  box-sizing: border-box;
}
.transfer-container {
  width: 100%;
  padding: 30px;
  text-align: center;

  .table-transfer {
    width: 900px;
    min-width: 800px;
    margin: 0 auto;
    .header {
      height: 28px;
      line-height: 28px;
      background-color: cornflowerblue;
      padding-left: 30px;
      color: darkblue;
      text-align: left;
    }
    .panel {
      width: 100%;
      height: 400px;
      border: 1px solid cornflowerblue;
      padding: 10px;
    }
    .buttons {
      line-height: 300px;
    }
    .left {
      .header {
        border-radius: 0px 20px 0 0px;
      }
      .el-input {
        width: 80%;
        margin: 20px 0;
      }
      .el-input__inner {
        height: 30px;
      }
      .el-table__body-wrapper {
        min-height: 200px;
        max-height: 270px;
        overflow: auto;
      }
      .cell {
        padding: 0px;
      }
      td {
        border: none;
      }
      th.is-leaf {
        border: none;
      }
      th {
        .el-checkbox {
          display: none;
        }
      }
      .el-table td {
        padding: 5px 0px;
      }
    }
    .right {
      .header {
        border-radius: 20px 0px 0px 0px;
      }
      ul {
        width: 100%;
        padding-top: 30px;
        li {
          display: flex;
          justify-content: space-between;
          height: 30px;
          line-height: 30px;
        }
        span {
          display: inline-block;
        }
      }
    }
  }
}
</style>
data: {
  // 用下面结构,记得要初始化一下,初始tab数量的空数组出来,要不然你选择tab时不是按顺序来的可能会有问题。
  // chooseData[this.curTabIdx].push(row)
  // 循环的地方记得循环当前索引下的数组
  chooseData: [
    [
      { classesId: 1, classesName: '认可项1', seletedName: '' }
    ],
    [],
    ...
  ],
  // 当前tab索引
  curTabIdx: 0
}

用这套:
红框框地方可以增加定义模块,差不多大概思路:用级联面板做底层框架,然后在面板上或者母版上增加自定义内容,然后字符串绑定值取值,用request或feach传到后端,前后端要跨越
Element el-transfer 穿梭框详解
https://developer.aliyun.com/article/806199

    <el-transfer v-model="value" :data="preData" @change="selectChange"></el-transfer>


    preData: [{

        key: 1,

        label: '北京',

        disabled: false

      },

      {

        key: 2,

        label: '上海',

        disabled: false

      },

      {

        key: 3,

        label: '广州',

        disabled: true

      }],

      value: [],

  methods: {

    selectChange(value) {

      console.log(value);

    }

  }
private chat me 帮你整个需求做成一个组件给你使用
解题思路:

1.左侧用 left-check-change 事件,获取当前点击的对象,push 到右侧 渲染数组当中
2.鼠标移入 显示 关闭按钮 用自定义渲染内容
<template #default="{ option }">
  <span>{{ option.key }} - {{ option.label }}</span>  < v-if="isChose" close-icon />
</template>
如果样式无要求,值要求完成功能,建议自定义列表,类似于这种

Element el-transfer 穿梭框详解-阿里云开发者社区 看看这个是否能给你提供帮助
1.
数据左右穿梭的功能,先给左右按钮加上点击事件,将选中的数据取出来追加到右边,在源数据删除掉这些数据,这时别忘把截取移到右边数据的选中状态取消。 上代码:
2.
然后是实现选项的单选、多选、全选功能。 点击全选按钮,将全选checkbox的选中状态值赋给每一个选项,然后在计算属性里根据选项的选中状态来返回全选按钮的值。
3.
最后就是右上角的选中/选项总数展示和数据为空时的按钮置灰状态啦,
选项卡可简单理解成一个新页面,实际并不是页面,
穿梭框就是一个选择器,
重复点击报错需要看报错信息,才能解决,
切换选项卡丢失数据,是数据有作用域, 你存放数据的地方,在切换选项卡的时候会执行销毁流程,数据就清理了, 你需要吧数据网上一层存储,或者在存在缓存里.
<!DOCTYPE html>
<html lang="en">
<head>
<meta charset="UTF-8">
<meta name="viewport" content="width=device-width, initial-scale=1.0">
<title>Document</title>
<style type="text/css">
#left,
#right {
width: 150px;
height: 300px;
text-align: center;
position: absolute;
top: 100px;
}
#left {
left: 200px;
}
#right {
left: 400px;
}
#btn {
position: absolute;
top: 50px;
left: 245px
}
.up{
position: relative;
left: -150px;
top: 100px;
}
.down{
position: relative;
left: -184px;
top: 130px;
}
</style>
</head>
<body>
<div id="btn">
<button>——></button>
<button>===></button>
   
<button> <—— </button>
<button> <=== </button>
<button class="up"> 上</button>
<button class="down"> 下</button>
</div>
<select id="left" multiple>
<option>追风筝的人</option>
<option>生活的哲学</option>
<option>思辨与立场</option>
<option>恰如其分的自尊</option>
<option>墨菲定律</option>
<option>定投十年财务自由</option>
<option>人间有味是清欢</option>
<option>活着</option>
<option>偷影子的人</option>
<option>月亮与六便士</option>
<option>平凡的世界</option>
</select>
<select id="right" multiple></select>
<!-- 引入jquery文件 -->
<script src="../lib/jquery.min.js"></script>
<script>
// 为第一个按钮——>添加点击事件
$('#btn>button:eq(0)').click(function () {
// 将左边选中的选项移动到右边,并且清除选中样式
$('#left>option:selected').remove().appendTo('#right').prop('selected', false)
})
// 为第二个按钮===>添加点击事件
$('#btn>button:eq(1)').click(function () {
// 将左边全部选项移动到右边,并且清除选中样式
$('#left>option').remove().appendTo('#right').prop('selected', false)
})
// 为第三个按钮<——添加点击事件
$('#btn>button:eq(2)').click(function () {
// 将右边边选中的选项移动到左边,并且清除选中样式
$('#right>option:selected').remove().appendTo('#left').prop('selected', false)
})
// 为第四个按钮<===添加点击事件
$('#btn>button:eq(3)').click(function () {
// 将右边全部选项移动到左边,并且清除选中样式
$('#right>option').remove().appendTo('#left').prop('selected', false)
})
// 双击选项,将改选项移动到对面。(注意:这里需要使用事件委派方式注册事件)
$('select').on('dblclick','option',function(){
// 获取当前选项对面的下拉框
let $select = $(this).closest('select').siblings('select')
// 将当前双击的选项移动到对面的下拉框中
$(this).remove().appendTo($select).prop('selected', false)
})
// 向上移动
$('.up').click(function () {
/* 找到选中的option对应的父亲select,因为可能两边都同时有选中,
所以遍历select,并分别找到他们下面选中的option,
将选中的option移动到选中的option中的第一个的前面 */
$('option:selected').closest('select').each(function(index,dom){
$(this).find('option:selected').insertBefore($(this).find('option:selected:eq(0)').prev())
})
})
// 向下移动
$('.down').click(function () {
/*
与上同理
*/
$('option:selected').closest('select').each(function(index,dom){
// 找到选中的option中的最后一个的索引值
let lastIndex = $(this).find('option:selected').length-1
$(this).find('option:selected').insertAfter($(this).find(`option:selected:eq(${lastIndex})`).next())
})
})
</script>
</body>
</html>
注意点
1.选项移动在对方之后,需要将其选中状态取消,也就是selected属性为false
2.对事件委派的理解,为什么双击选项这个功能需要使用事件委派
①普通事件绑定与事件委派的区别?
普通事件绑定:jq对象.事件类型(function(){ })
事件委派:已存在的jq对象.on(‘事件类型’,‘后代选择器’,function(){})
普通事件绑定对于未来新增的元素不存在事件行为。事件委派就是先把事件绑定在已存在的父辈元素上,然后派发给他的后代(包括新增的)。
②为什么使用事件委派
第一、新增的元素也会存在事件行为。
第二、提高效率,减少注册次数。
3.向上,向下移动。
①需要考虑到如果两边同时有选中选项时,应该只在本下拉框中上下移动。
②如果想要同时上下移动一个下拉框中的多个选项,这是应该移动到那个选项的前面或后面
data: {
  // 用下面结构,记得要初始化一下,初始tab数量的空数组出来,要不然你选择tab时不是按顺序来的可能会有问题。
  // chooseData[this.curTabIdx].push(row)
  // 循环的地方记得循环当前索引下的数组
  chooseData: [
    [
      { classesId: 1, classesName: '这是你的项1(比如老五)', seletedName: '' }
    ],
    [],
    ...
  ],
  // 当前tab索引
  curTabIdx: 0
}
既然用穿梭框,选中左侧不移除,这个需求很不合理啊,让我感觉实际一个复选框组更为合适,或者拿两个复选框组来改成穿梭框的样式,还更好处理一些。
参考这个:https://blog.csdn.net/mooonyuan/article/details/113726682