一个图像测距的问题,需要用到图像校正。
萌新小白求大神解答,功能主要是实现跳远距离的测量,请问怎么校正这个透视产生的梯形,目前能想到的就是插值的方法,通过插值来校正成矩形,但不知道具体怎么实施,直接检测沙坑四个点做透视变换的误差在3cm左右,效果还不理想,求大神们解答。
由于你的功能是测量跳远距离,那么主要在意纵向精度,那么你在纵向位置选择9个点,得到9个点的图像坐标,然后去测量这9个点,得到这9个点的实际距离,找一个图像算法库里面的方法生成标定文件。 有了标定文件就可以把你的任意图像坐标转换为实际距离(同样图像算法库里有现成的方法)。亲测9点标定在3个像素精度
你可能需要看看世界坐标系,相机坐标系,图像坐标系这几个改变。
先阈值分割 检测沙坑形成的梯形,然后将整幅图做透视变换还原为真实场景,再通过沙坑的长宽实际距离来计算距离
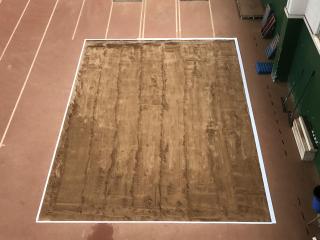
很有意思,这是刚找的四个点:
# 寻找四点
def findTrapezoidal(oImg):
    font = cv2.FONT_HERSHEY_SIMPLEX
    # mImg = imutils.resize(oImg, width=1000)  #缩小
    img = oImg.copy()

    # 色调
    hsv = cv2.cvtColor(img, cv2.COLOR_BGR2HSV)
    sat = hsv[:, :, 1]

    # threshold and invert 阈值和反转
    thresh = cv2.threshold(sat, 10, 255, cv2.THRESH_BINARY)[1]
    thresh = 255 - thresh

    # apply morphology dilate 形态扩张
    kernel = cv2.getStructuringElement(cv2.MORPH_ELLIPSE, (15, 15))
    thresh = cv2.morphologyEx(thresh, cv2.MORPH_DILATE, kernel)
    # contour 轮廓
    cnts, hierarchy = cv2.findContours(thresh, cv2.RETR_TREE, cv2.CHAIN_APPROX_NONE)

    points = []
    for cnt in cnts:
        area = cv2.contourArea(cnt)

        # 找最大的:这是内框
        if 5_800_000 > area > 5_400_000:
            print('area: ', area)
            approx = cv2.approxPolyDP(cnt, 0.009 * cv2.arcLength(cnt, True), True)

            # 画框
            cv2.drawContours(img, cnt, -1, (0, 255, 75), 5)

            # 找 vertices 顶点
            n = approx.ravel()
            i = 0

            for j in n:
                if i % 2 == 0:
                    x = n[i]
                    y = n[i + 1]

                    # String containing the co-ordinates.
                    string = str(x) + " " + str(y)

                    if i == 0:
                        # 最高的
                        # print(f'顶点: {x}, {y}')
                        points.append((x, y))
                        # cv2.putText(img, "Arrow tip", (x, y-5),
                        #             font, 0.5, (255, 0, 0))
                    else:
                        # 剩余的
                        # print(string)
                        points.append((x, y))
                        # cv2.putText(img, string, (x, y-5),
                        #             font, 0.5, (0, 255, 0))
                i = i + 1

    points = sorted(points, key=lambda k: [k[1], k[0]])
    print('找到的点: ', points)
    if len(points) == 4:
        print(f'上右: {points[0]}, 上左:{points[1]}\t\t下右: {points[3]}, 下左:{points[2]}', points)
    for pt in points:
        cv2.circle(img, pt, 5, [0, 0, 255], 100)

    return img

# 坐标排列
def order_points(pts):
    # 坐标启动
    rect = np.zeros((4, 2), dtype="float32")
    # 左上 有最小的 和
    # 右下 有最大的 和
    s = np.sum(pts, axis=1)
    rect[0] = pts[np.argmin(s)]
    rect[2] = pts[np.argmax(s)]
    # 右上 有最小的 差
    # 左下 有最大的 差
    diff = np.diff(pts, axis=1)
    rect[1] = pts[np.argmin(diff)]
    rect[3] = pts[np.argmax(diff)]
    return rect


# 鸟视转换
def four_point_transform(pts, img):
    # 坐标排列
    rect = order_points(pts)
    (tl, tr, br, bl) = rect
    # 计算 最高宽度(x 轴):右下 --》 左下 对比 右上 --》 左上
    widthA = np.sqrt(((br[0] - bl[0]) ** 2) + ((br[1] - bl[1]) ** 2))
    widthB = np.sqrt(((tr[0] - tl[0]) ** 2) + ((tr[1] - tl[1]) ** 2))
    maxWidth = max(int(widthA), int(widthB))
    # 计算 最高高度(y 轴):右上 --》 右下 对比 左上 --》 左下
    heightA = np.sqrt(((tr[0] - br[0]) ** 2) + ((tr[1] - br[1]) ** 2))
    heightB = np.sqrt(((tl[0] - bl[0]) ** 2) + ((tl[1] - bl[1]) ** 2))
    maxHeight = max(int(heightA), int(heightB))
    # 鸟视
    dst = np.array([
        [0, 0],
        [maxWidth - 1, 0],
        [maxWidth - 1, maxHeight - 1],
        [0, maxHeight - 1]], dtype="float32")
    M = cv2.getPerspectiveTransform(rect, dst)
    warped = cv2.warpPerspective(img, M, (maxWidth, maxHeight))

    return warped
好像转错了。
改改:
# 寻找四点
def findTrapezoidal(oImg):
    font = cv2.FONT_HERSHEY_SIMPLEX
    # mImg = imutils.resize(oImg, width=1000)  #缩小
    img = oImg.copy()

    # 色调
    hsv = cv2.cvtColor(img, cv2.COLOR_BGR2HSV)
    sat = hsv[:, :, 1]

    # threshold and invert 阈值和反转
    thresh = cv2.threshold(sat, 10, 255, cv2.THRESH_BINARY)[1]
    thresh = 255 - thresh

    # apply morphology dilate 形态扩张
    kernel = cv2.getStructuringElement(cv2.MORPH_ELLIPSE, (15, 15))
    thresh = cv2.morphologyEx(thresh, cv2.MORPH_DILATE, kernel)
    # contour 轮廓
    cnts, hierarchy = cv2.findContours(thresh, cv2.RETR_TREE, cv2.CHAIN_APPROX_NONE)

    points = []
    for cnt in cnts:
        area = cv2.contourArea(cnt)

        # 找最大的:这是内框
        if 5_800_000 > area > 5_400_000:
            print('area: ', area)
            approx = cv2.approxPolyDP(cnt, 0.009 * cv2.arcLength(cnt, True), True)

            # 画框
            cv2.drawContours(img, cnt, -1, (0, 255, 75), 5)

            # 找 vertices 顶点
            n = approx.ravel()
            i = 0

            for j in n:
                if i % 2 == 0:
                    x = n[i]
                    y = n[i + 1]

                    # String containing the co-ordinates.
                    string = str(x) + " " + str(y)

                    if i == 0:
                        # 最高的
                        # print(f'顶点: {x}, {y}')
                        points.append((x, y))
                        # cv2.putText(img, "Arrow tip", (x, y-5),
                        #             font, 0.5, (255, 0, 0))
                    else:
                        # 剩余的
                        # print(string)
                        points.append((x, y))
                        # cv2.putText(img, string, (x, y-5),
                        #             font, 0.5, (0, 255, 0))
                i = i + 1

    print('找到的点: ', points)
    if len(points) == 4:
        print(f'右上: {points[0]}, 右下:{points[1]}\t\t左上: {points[3]}, 左下:{points[2]}')
        cv2.circle(img, points[0], 5, [0, 0, 255], 100)  # Red
        cv2.circle(img, points[1], 5, [205, 0, 0], 100)  # Blue
        cv2.circle(img, points[2], 5, [139, 0, 139], 100)  # Magenta
        cv2.circle(img, points[3], 5, [47, 255, 173], 100)  # Green

    return points, img
然后对号改改:
# 坐标排列
def order_points(pts):
    # 坐标启动
    rect = np.zeros((4, 2), dtype="float32")
    # 左上 有最小的 和
    # 右下 有最大的 和
    s = np.sum(pts, axis=1)
    rect[1] = pts[np.argmin(s)]
    rect[3] = pts[np.argmax(s)]
    # 右上 有最小的 差
    # 左下 有最大的 差
    diff = np.diff(pts, axis=1)
    rect[2] = pts[np.argmin(diff)]
    rect[0] = pts[np.argmax(diff)]
    return rect
鸟视更新:
# 鸟视转换
def four_point_transform(pts, img):
    # 坐标排列
    # print('old: ', pts)
    rect = order_points(pts)
    # print('new: ', rect)

    (tl, tr, br, bl) = rect

    # 计算 最高宽度(x 轴):右下 --》 左下 对比 右上 --》 左上
    widthA = np.sqrt(((br[0] - bl[0]) ** 2) + ((br[1] - bl[1]) ** 2))
    widthB = np.sqrt(((tr[0] - tl[0]) ** 2) + ((tr[1] - tl[1]) ** 2))
    maxWidth = max(int(widthA), int(widthB))
    print('maxW: ', maxWidth)

    # 计算 最高高度(y 轴):右上 --》 右下 对比 左上 --》 左下
    heightA = np.sqrt(((tr[0] - br[0]) ** 2) + ((tr[1] - br[1]) ** 2))
    heightB = np.sqrt(((tl[0] - bl[0]) ** 2) + ((tl[1] - bl[1]) ** 2))
    maxHeight = max(int(heightA), int(heightB))
    print('maxH: ', maxHeight)

    # 鸟视
    dst = np.array([
        [0, 0],
        [maxHeight - 1, 0],
        [maxHeight - 1, maxWidth - 1],
        [0, maxWidth - 1]], dtype="float32")
    M = cv2.getPerspectiveTransform(rect, dst)
    # result = cv2.warpPerspective(frame, matrix, (500, 600))
    warped = cv2.warpPerspective(img, M, (maxHeight, maxWidth))

    return warped
缩小比例:
# 更新图像尺寸
def ResizeWithAspectRatio(image, width=None, height=None, inter=cv2.INTER_AREA):
    dim = None
    (h, w) = image.shape[:2]

    if width is None and height is None:
        return image
    if width is None:
        r = height / float(h)
        dim = (int(w * r), height)
    else:
        r = width / float(w)
        dim = (width, int(h * r))
    return cv2.resize(image, dim, interpolation=inter)
显示:
# =====================================
# main
# =====================================
# load the example image
image = cv2.imread(".\\test\\sandbox.jpg")
corners, imgCp = findTrapezoidal(image)

shiftImg = four_point_transform(corners, imgCp)
# image = cv2.rotate(shiftImg, cv2.cv2.ROTATE_90_CLOCKWISE)

imgResized = ResizeWithAspectRatio(imgCp, width=400)
cpResized = ResizeWithAspectRatio(shiftImg, height=400, width=500)

# =====================================
# Window 窗口: Demo
# =====================================
demo_win = 'Demo'
cv2.namedWindow(demo_win)
cv2.moveWindow(demo_win, 400, 80)
cv2.resizeWindow(demo_win, 400, 300)

# =====================================
# Window 窗口: Selected
# =====================================
select_win = 'Selected'
cv2.namedWindow(select_win)
cv2.moveWindow(select_win, 810, 80)
# cv2.resizeWindow(select_win, 500, 400)

while True:
    cv2.imshow(demo_win, imgResized)
    cv2.imshow(select_win, cpResized)
    # keyboard control
    key = cv2.waitKey(1)
    if key == ord("q") or key == ord("Q"):
        break

cv2.destroyAllWindows()
这次翻对了:挺好玩的,就没有尺寸,无法标注。

9点标定,或者使用标定板标定,标定完毕后转换图像坐标,通过转换的坐标来求距离, 4点仿射变换精度<9点标定精度<标定板标定精度