微信小程序,在一个表单界面,将图片和其他数据一起存入云数据库中,怎么上传图片的存储路径
- 在小程序中,wxml中是一个表单,这个表单提交书籍信息, 包括书籍的图片,名称和价格,首先点击上传图片, 将在这个界面上预览显示出来图片, 之后填写名称和价格然后点击提交, 将数据存到云数据库,就是小程序云开发模式腾讯提供的云数据库,
- 1.求一段JS代码来解决这个问题, 我搞不懂图片在预览之后怎么上传到云存储中, 然后取出图片的存储路径上传到数据库中? 重点是在一个页面中进行这个操作
https://blog.csdn.net/qq_35713752/article/details/77970370
首先云数据库应该是指微信小程序自带的云数据库,首先你的问题有两个
一、图片上传云数据库
二、取出图片的存储路径上传到云数据库
上图是图片上传云数据库的地址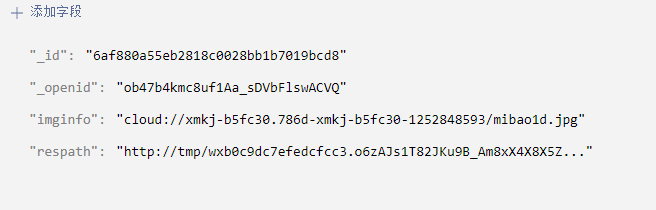
上图是图片地址进入数据链表的地址
接来下,我们上传微信小程序端的代码
//index.js
const app = getApp()

Page({
  data: {
    avatarUrl: './user-unlogin.png',
    userInfo: {},
    logged: false,
    takeSession: false,
    requestResult: ''
  },

  onLoad: function() {
    var that = this
    // 调用云函数
    wx.cloud.callFunction({
      name: 'login',
      data: {},
      success: res => {
        console.log('[云函数] [login] user openid: ', res.result.openid)
        app.globalData.openid = res.result.openid
        that.setData({
          openid_info: res.result.openid
        })
      },
      fail: err => {
        console.error('[云函数] [login] 调用失败', err)

      }
    })
  },

  // 上传图片
  getdata() {
    let that = this;
    wx.chooseImage({    //这一段是上传图片
      sizeType: ['original', 'compressed'],
      sourceType: ['album', 'camera'],
      success: function (res) {
        wx.showLoading({
          title: '上传中',
        });
        let filePath = res.tempFilePaths[0];
        wx.cloud.uploadFile({     //这一段是上传到云数据中的
          cloudPath: 'mibao1d.jpg',
          filePath: filePath,    //这个就是图片的存储路径
          success: res => {
            console.log('[上传图片]成功:', res)
            that.setData({
              bigImg: res.fileID,
            });
            let fileID = res.fileID;
            let open_info = that.data.openid_info
            console.log(that.data.bigImg)
            console.log(that.data.openid_info)
            wx.getImageInfo({
              src: that.data.bigImg,
              success: function (res) {
                console.log('happening:', res.path) //这个是转换的临时链接res.path
                that.setData({
                  tempath:res.path
                })
                console.log('tempath',that.data.tempath)
                let tempinfo = that.data.tempath
                db.collection('newdata').add({    //这个就把云数据的图片存储路径上传到数据链表中了
                  data: {
                    imginfo: fileID,
                    respath: tempinfo
                  },
                  success(res) {
                    console.log('get success')
                    console.log(res)
                    console.log(tempinfo)
                  }
                })
              },
              fail: function (res) {
                console.log('failure')
              }
            })

            const db = wx.cloud.database();

          },
          fail: e => {
            console.error('[上传图片]失败:', e)
          },
          complete: () => {
            wx.hideLoading()
          }
        });
      }
    })
  }
})
<!--index.wxml-->
<view class="container">

  <!-- 上传图片 -->
  <view class="uploader">
    <view class="uploader-text" bindtap="getdata">
      <text>上传图片</text>
    </view>
    <view class="uploader-container" wx:if="{{bigImg}}">
      <image class="uploader-image" src="{{bigImg}}" mode="aspectFit" bindtap="previewImg"></image>
    </view>
  </view>

</view>
/**index.wxss**/

page {
  background: #f6f6f6;
  display: flex;
  flex-direction: column;
  justify-content: flex-start;
}

.userinfo, .uploader, .tunnel {
  margin-top: 40rpx;
  height: 140rpx;
  width: 100%;
  background: #fff;
  border: 1px solid rgba(0, 0, 0, 0.1);
  border-left: none;
  border-right: none;
  display: flex;
  flex-direction: row;
  align-items: center;
  transition: all 300ms ease;
}


.uploader, .tunnel {
  height: auto;
  padding: 0 0 0 40rpx;
  flex-direction: column;
  align-items: flex-start;
  box-sizing: border-box;
}

.uploader-text, .tunnel-text {
  width: 100%;
  line-height: 52px;
  font-size: 34rpx;
  color: #007aff;
}

.uploader-container {
  width: 100%;
  height: 400rpx;
  padding: 20rpx 20rpx 20rpx 0;
  display: flex;
  align-content: center;
  justify-content: center;
  box-sizing: border-box;
  border-top: 1px solid rgba(0, 0, 0, 0.1);
}

.uploader-image {
  width: 100%;
  height: 360rpx;
}