关于JAVA邮件发送功能的代码
我在一个main函数中可以测试到邮件发送了 并且邮箱有反应
但是单独的拿到工具类中就会出错 我想问怎么将发送邮件的代码
封装成工具类??????
1、把pop3和smtp服务都开通;2、指定服务器端口587试试 props.setProperty("mail.port", 587);3、看看堆栈信息有没有其他报错,是否是由于其他报错导致不能验证登录
 package util;

import bean.EmailSenderInfo;
import bean.ScheduleEmailBean;

import java.io.ByteArrayInputStream;
import java.io.IOException;
import java.util.Date;
import java.util.Properties;

import javax.activation.DataHandler;
import javax.mail.Message;
import javax.mail.Message.RecipientType;
import javax.mail.Multipart;
import javax.mail.Session;
import javax.mail.Transport;
import javax.mail.internet.InternetAddress;
import javax.mail.internet.MimeBodyPart;
import javax.mail.internet.MimeMessage;
import javax.mail.internet.MimeMultipart;
import javax.mail.util.ByteArrayDataSource;

import listener.ResourceConfiger;

import org.apache.commons.logging.Log;
import org.apache.commons.logging.LogFactory;

public class MailSendUtil
{
  private static final Log logger = LogFactory.getLog(MailSendUtil.class);

  public void sendMail(byte[] content, ScheduleEmailBean salesFollowupBean) throws IOException
  {
    logger.debug("==== MailSendUtil.sendMail() start====");

    EmailSenderInfo mailSenderInfo = new EmailSenderInfo();
    try
    {
      mailSenderInfo.setMailServerHost(
        ResourceConfiger.get("email.server.host"));
      mailSenderInfo.setTransport(
        ResourceConfiger.get("email.server.transport"));
      mailSenderInfo.setFromAddress(
        ResourceConfiger.get("email.from.address"));
      mailSenderInfo.setUserName(
        ResourceConfiger.get("email.from.userName"));
      mailSenderInfo.setPassword(
        ResourceConfiger.get("email.from.userPassword"));
      String[] toadderss = salesFollowupBean.getRecipients();

      mailSenderInfo.setSubject(salesFollowupBean.getSubject());

      mailSenderInfo.setToAddress(toadderss[0]);
      mailSenderInfo.setToAddressArray(toadderss);

      mailSenderInfo.setDoSend(true);
      mailSendProccess(mailSenderInfo, content);
    } catch (IOException ex) {
      ex.printStackTrace();
    } catch (Exception e) {
      e.printStackTrace();
    }
  }

  public void mailSendProccess(EmailSenderInfo mailSenderInfo, byte[] content)
    throws Exception
  {
    Properties props = new Properties();
    props.put("mail.smtp.host", mailSenderInfo.getMailServerHost());
    props.put("mail.smtp.auth", "true");

    Session session = Session.getInstance(props);
    session.setDebug(true);

    MimeMessage message = new MimeMessage(session);
    message.setSubject(mailSenderInfo.getSubject(), "utf-8");
    message.setSentDate(new Date());
    message.setFrom(new InternetAddress(mailSenderInfo.getFromAddress()));

    String[] mailToArray = mailSenderInfo.getToAddressArray();
    if ((mailToArray == null) || (mailToArray.length == 0)) {
      InternetAddress toAddress = new InternetAddress(
        mailSenderInfo.getToAddress());
      message.setRecipient(Message.RecipientType.TO, toAddress);
    } else {
      InternetAddress[] toAddressList = new InternetAddress[mailToArray.length];
      for (int index = 0; index < mailToArray.length; ++index) {
        if ((toAddressList == null) || (mailToArray[index] == null) ||
          (mailToArray[index].trim().length() <= 0)) continue;
        toAddressList[index] =
          new InternetAddress(mailToArray[index]);
      }

      message.addRecipients(Message.RecipientType.TO, toAddressList);
    }

    Multipart multipart = new MimeMultipart();
    MimeBodyPart iCalAttachment = new MimeBodyPart();

    iCalAttachment.setDataHandler(
      new DataHandler(new ByteArrayDataSource(new ByteArrayInputStream(content),
      "text/calendar;method=REQUEST;charset=\"UTF-8\"")));
    multipart.addBodyPart(iCalAttachment);
    message.setContent(multipart);
    Transport tranSport = session.getTransport(mailSenderInfo
      .getTransport());
    tranSport.connect(mailSenderInfo.getMailServerHost(),
      mailSenderInfo.getUserName(), mailSenderInfo.getPassword());
    tranSport.sendMessage(message, message.getAllRecipients());
    tranSport.close();
    logger.info("........send mail success....");
  }
}
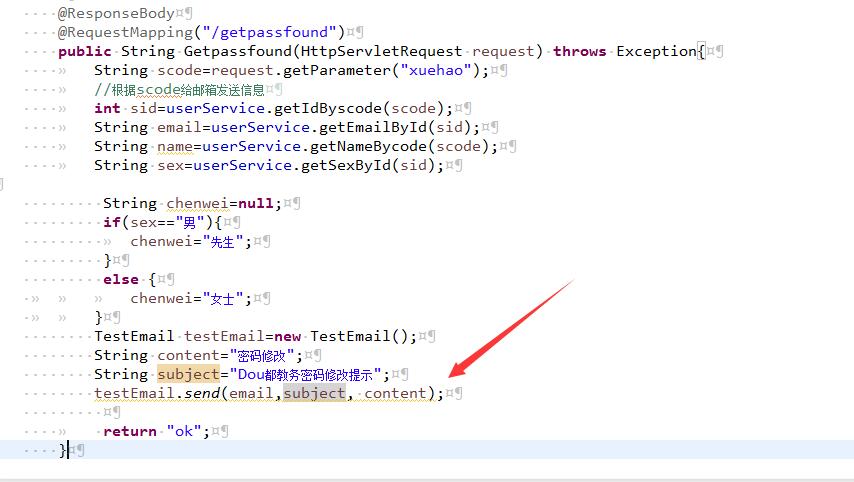
@ResponseBody
@RequestMapping("/getpassfound")
public String Getpassfound(HttpServletRequest request) throws Exception{
System.out.println("到这了1");
String scode=request.getParameter("xuehao");
//根据scode给邮箱发送信息
System.out.println("到这了2"+scode);
int sid=userService.getIdByscode(scode);
//System.out.println(sid);
String email=userService.getEmailById(sid);
String name=userService.getNameBycode(scode);
String sex=userService.getSexById(sid);
        System.out.println("email:"+email+","+"name:"+name);
        /**
         * 将email name  sex  发送过去  进行确认
         */
         Properties props = new Properties();
         // 开启debug调试
         props.setProperty("mail.debug", "true");
         // 发送服务器需要身份验证
         props.setProperty("mail.smtp.auth", "true");
         // 设置邮件服务器主机名
         props.setProperty("mail.host", "smtp.qq.com");
         // 发送邮件协议名称
         props.setProperty("mail.transport.protocol", "smtp");
         MailSSLSocketFactory sf = new MailSSLSocketFactory();
         sf.setTrustAllHosts(true);
         props.put("mail.smtp.ssl.enable", "true");
         props.put("mail.smtp.ssl.socketFactory", sf);
         Session session = Session.getInstance(props);
         String chenwei=null;
         if(sex=="男"){
            chenwei="先生";
         }
         else {
            chenwei="女士";
        }

         Message msg = new MimeMessage(session);
         msg.setSubject("密码重置信息");
         StringBuilder builder = new StringBuilder();
        builder.append(name+chenwei+":<br>请登陆以下链接重置密码:"+"http://www.baidu.com");
         msg.setText(builder.toString());
         msg.setFrom(new InternetAddress("2365956483@qq.com"));
         msg.setSentDate(new Date());
         Transport transport = session.getTransport();
         //upehnpvwyzgvdidc
transport.connect("smtp.qq.com", "qq邮箱", "ssl密码");//显示的是这里出错530 ssl我也验证过 手机也获得了密码 仙剑java工程可以运行发送 但是在项目里 就不行了
         transport.sendMessage(msg, new Address[] { new InternetAddress(email) });
         transport.close();
        return "ok";
    }
EHLO PC
250-smtp.qq.com
250-PIPELINING
250-SIZE 73400320
250-STARTTLS
250-AUTH LOGIN PLAIN
250-AUTH=LOGIN
250-MAILCOMPRESS
250 8BITMIME
DEBUG SMTP: Found extension "PIPELINING", arg ""
DEBUG SMTP: Found extension "SIZE", arg "73400320"
DEBUG SMTP: Found extension "STARTTLS", arg ""
DEBUG SMTP: Found extension "AUTH", arg "LOGIN PLAIN"
DEBUG SMTP: Found extension "AUTH=LOGIN", arg ""
DEBUG SMTP: Found extension "MAILCOMPRESS", arg ""
DEBUG SMTP: Found extension "8BITMIME", arg ""
DEBUG SMTP: Attempt to authenticate
AUTH LOGIN
334 VXNlcm5hbWU6
MjM2NTk1NjQ4M0BxcS5jb20=
530 Error: A secure connection is requiered(such as ssl). More information at http://service.mail.qq.com/cgi-bin/help?id=28
错误如下:
三月 24, 2018 1:03:08 下午 org.apache.catalina.core.StandardWrapperValve invoke
严重: Servlet.service() for servlet [mvc-dispatcher] in context with path [/ssm2] threw exception [Request processing failed; nested exception is javax.mail.AuthenticationFailedException] with root cause
javax.mail.AuthenticationFailedException
at javax.mail.Service.connect(Service.java:306)
at javax.mail.Service.connect(Service.java:156)
at com.cn.controller.UserController.Getpassfound(UserController.java:485)
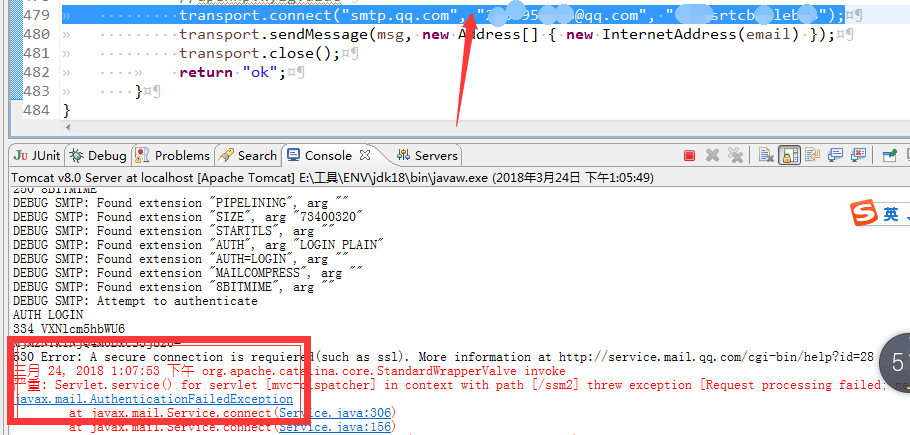
打马赛克的地方就是报错的地方
你把main方法代码给我,我给你封装成工具类
这是我写的一个工具类,本地测试是可以运行的。如果你放到项目上发现不能运行。看看是不是项目的javamail版本有问题
MailSSLSocketFactory应该是javamail1.4以后的版本才可以
 package com.test.demo;

import java.security.GeneralSecurityException;
import java.util.Date;
import java.util.Properties;

import javax.mail.Address;
import javax.mail.Message;
import javax.mail.Session;
import javax.mail.Transport;
import javax.mail.internet.InternetAddress;
import javax.mail.internet.MimeMessage;

import com.sun.mail.util.MailSSLSocketFactory;

public class EmailSender {
    private static final String FROM_EMAIL = "发送邮箱";
    private static final String SSL_PASSWORD = "发送邮箱密码";
    private static Properties props;
    static {
        props = new Properties();
        // 指定协议
        props.put("mail.transport.protocol", "smtp");
        // 主机 smtp.qq.com
        props.put("mail.smtp.host", "smtp.qq.com");
        // 用户密码认证
        props.put("mail.smtp.auth", "true");
        // 调试模式
        props.put("mail.debug", "true");
        props.setProperty("mail.transport.protocol", "smtp");
        try {
            MailSSLSocketFactory sf = new MailSSLSocketFactory();
            sf.setTrustAllHosts(true);
            props.put("mail.smtp.ssl.enable", "true");
            props.put("mail.smtp.ssl.socketFactory", sf);
        } catch (GeneralSecurityException e) {
            throw new RuntimeException(e.getMessage(), e);
        }
    }

    public static void send(String recipients, String subject, String content)
            throws Exception {
        Session session = Session.getInstance(props);
        // 创建邮件对象
        // 设置邮件收件人
        Message msg = new MimeMessage(session);
        msg.setSubject(subject);
        msg.setText(content);
        msg.setFrom(new InternetAddress(FROM_EMAIL));
        String[] recipientArray = recipients.split(",");
        Address[] addrs = new Address[recipientArray.length];
        for (int i = 0; i < recipientArray.length; i++) {
            addrs[i] = new InternetAddress(recipientArray[i]);
        }
        msg.setRecipients(Message.RecipientType.TO, addrs);
        msg.setSentDate(new Date());
        Transport transport = null;
        try {
            transport = session.getTransport();
            transport.connect(FROM_EMAIL, SSL_PASSWORD);
            transport.sendMessage(msg, msg.getAllRecipients());
        } finally {
            if (transport != null) {
                transport.close();
            }
        }
    }
}
Properties props = new Properties();
// 开启debug调试
props.setProperty("mail.debug", "true");
// 发送服务器需要身份验证
props.setProperty("mail.smtp.auth", "true");
// 设置邮件服务器主机名
props.setProperty("mail.host", "smtp.qq.com");
    // 发送邮件协议名称
    props.setProperty("mail.transport.protocol", "smtp");
    MailSSLSocketFactory sf = new MailSSLSocketFactory();
    sf.setTrustAllHosts(true);
    props.put("mail.smtp.ssl.enable", "true");
    props.put("mail.smtp.ssl.socketFactory", sf);

    Session session = Session.getInstance(props);

    Message msg = new MimeMessage(session);
    msg.setSubject("密码重置信息");
    msg.setSentDate(new Date());
    msg.setDescription("只是一封来自Dou都教务的邮件");
    StringBuilder builder = new StringBuilder();
    builder.append(":<br>请点击确定以重置密码:<a href=''>确定</a>");
    msg.setText(builder.toString());
    msg.setFrom(new InternetAddress("邮箱地址"));
    Transport transport = session.getTransport();
    transport.connect("smtp.qq.com", "qq邮箱", "password");
    transport.sendMessage(msg, new Address[] { new InternetAddress("2365778965@qq.com") });
    transport.close();
我试过了,你的代码可以运行。很有可能是你获取的qq授权码不对,你再重新获取下试试
# 好了!结贴! mail.jar 从1.4换成1.5就行了! 但事先是你得开启QQ的协议
package cn.Douzi.send;
import javax.mail.Session;
import javax.mail.Transport;
import javax.mail.internet.InternetAddress;
import javax.mail.internet.MimeMessage;
import java.util.Date;
import java.util.Properties;
public class Demo2 {
// 发件人的 邮箱 和 密码(替换为自己的邮箱和密码)
// PS: 某些邮箱服务器为了增加邮箱本身密码的安全性,给 SMTP 客户端设置了独立密码(有的邮箱称为“授权码”),
// 对于开启了独立密码的邮箱, 这里的邮箱密码必需使用这个独立密码(授权码)。
public static String myEmailAccount = "jdouzi@qq.com";
public static String myEmailPassword = "hkscqiuwbtopghbh";
// 发件人邮箱的 SMTP 服务器地址, 必须准确, 不同邮件服务器地址不同, 一般(只是一般, 绝非绝对)格式为: smtp.xxx.com
// 网易163邮箱的 SMTP 服务器地址为: smtp.163.com    腾讯: smtp.qq.com
public static String myEmailSMTPHost = "smtp.qq.com";

// 收件人邮箱(替换为自己知道的有效邮箱)
public static String receiveMailAccount = "jdouzi@qq.com";

public static void main(String[] args) throws Exception {
    // 1. 创建参数配置, 用于连接邮件服务器的参数配置
    Properties props = new Properties();                    // 参数配置
    props.setProperty("mail.transport.protocol", "smtp");   // 使用的协议(JavaMail规范要求)
    props.setProperty("mail.smtp.host", myEmailSMTPHost);   // 发件人的邮箱的 SMTP 服务器地址
    props.setProperty("mail.smtp.auth", "true");            // 需要请求认证

    // PS: 某些邮箱服务器要求 SMTP 连接需要使用 SSL 安全认证 (为了提高安全性, 邮箱支持SSL连接, 也可以自己开启),
    //     如果无法连接邮件服务器, 仔细查看控制台打印的 log, 如果有有类似 “连接失败, 要求 SSL 安全连接” 等错误,
    //     打开下面 /* ... */ 之间的注释代码, 开启 SSL 安全连接。

        // SMTP 服务器的端口 (非 SSL 连接的端口一般默认为 25, 可以不添加, 如果开启了 SSL 连接,
        //                  需要改为对应邮箱的 SMTP 服务器的端口, 具体可查看对应邮箱服务的帮助,
        //                  QQ邮箱的SMTP(SLL)端口为465或587, 其他邮箱自行去查看)
        final String smtpPort = "465";
        props.setProperty("mail.smtp.port", smtpPort);
        props.setProperty("mail.smtp.socketFactory.class", "javax.net.ssl.SSLSocketFactory");
        props.setProperty("mail.smtp.socketFactory.fallback", "false");
        props.setProperty("mail.smtp.socketFactory.port", smtpPort);


    // 2. 根据配置创建会话对象, 用于和邮件服务器交互
    Session session = Session.getDefaultInstance(props);
    session.setDebug(true);                                 // 设置为debug模式, 可以查看详细的发送 log

    // 3. 创建一封邮件
    MimeMessage message = createMimeMessage(session, myEmailAccount, receiveMailAccount);

    // 4. 根据 Session 获取邮件传输对象
    Transport transport = session.getTransport();

    // 5. 使用 邮箱账号 和 密码 连接邮件服务器, 这里认证的邮箱必须与 message 中的发件人邮箱一致, 否则报错
    //
    //    PS_01: 成败的判断关键在此一句, 如果连接服务器失败, 都会在控制台输出相应失败原因的 log,
    //           仔细查看失败原因, 有些邮箱服务器会返回错误码或查看错误类型的链接, 根据给出的错误
    //           类型到对应邮件服务器的帮助网站上查看具体失败原因。
    //
    //    PS_02: 连接失败的原因通常为以下几点, 仔细检查代码:
    //           (1) 邮箱没有开启 SMTP 服务;
    //           (2) 邮箱密码错误, 例如某些邮箱开启了独立密码;
    //           (3) 邮箱服务器要求必须要使用 SSL 安全连接;
    //           (4) 请求过于频繁或其他原因, 被邮件服务器拒绝服务;
    //           (5) 如果以上几点都确定无误, 到邮件服务器网站查找帮助。
    //
    //    PS_03: 仔细看log, 认真看log, 看懂log, 错误原因都在log已说明。
    transport.connect(myEmailAccount, myEmailPassword);

    // 6. 发送邮件, 发到所有的收件地址, message.getAllRecipients() 获取到的是在创建邮件对象时添加的所有收件人, 抄送人, 密送人
    transport.sendMessage(message, message.getAllRecipients());

    // 7. 关闭连接
    transport.close();
}

/**
 * 创建一封只包含文本的简单邮件
 *
 * @param session 和服务器交互的会话
 * @param sendMail 发件人邮箱
 * @param receiveMail 收件人邮箱
 * @return
 * @throws Exception
 */
public static MimeMessage createMimeMessage(Session session, String sendMail, String receiveMail) throws Exception {
    // 1. 创建一封邮件
    MimeMessage message = new MimeMessage(session);

    // 2. From: 发件人(昵称有广告嫌疑,避免被邮件服务器误认为是滥发广告以至返回失败,请修改昵称)
    message.setFrom(new InternetAddress(sendMail, "白小纯", "UTF-8"));

    // 3. To: 收件人(可以增加多个收件人、抄送、密送)
    message.setRecipient(MimeMessage.RecipientType.TO, new InternetAddress(receiveMail, "XX用户", "UTF-8"));

    // 4. Subject: 邮件主题(标题有广告嫌疑,避免被邮件服务器误认为是滥发广告以至返回失败,请修改标题)
    message.setSubject("测试一下发邮件功能", "UTF-8");

    // 5. Content: 邮件正文(可以使用html标签)(内容有广告嫌疑,避免被邮件服务器误认为是滥发广告以至返回失败,请修改发送内容)
    message.setContent("周末有聚餐,收到回复", "text/html;charset=UTF-8");

    // 6. 设置发件时间
    message.setSentDate(new Date());

    // 7. 保存设置
    message.saveChanges();

    return message;
}
}
// 1.创建一个程序与邮件服务器会话对象 Session
Properties props = new Properties();
props.setProperty("mail.transport.protocol", "SMTP");
props.setProperty("mail.smtp.host", "smtp.163.com");
props.setProperty("mail.smtp.port", "25");
// 指定验证为true
props.setProperty("mail.smtp.auth", "true");
props.setProperty("mail.smtp.timeout","1000");
// 验证账号及密码,密码需要是第三方授权码
Authenticator auth = new Authenticator() {
public PasswordAuthentication getPasswordAuthentication({
return new PasswordAuthentication("*******@163.com", "*******");
}
};
Session session = Session.getInstance(props, auth);
// 2.创建一个Message,它相当于是邮件内容
Message message = new MimeMessage(session);
// 设置发送者
message.setFrom(new InternetAddress("*******@163.com"));
// 设置发送方式与接收者
message.setRecipient(MimeMessage.RecipientType.TO, new InternetAddress(email));
// 设置主题
message.setSubject("邮件发送测试");
// 设置内容
message.setContent(emailMsg, "text/html;charset=utf-8");
// 3.创建 Transport用于将邮件发送
Transport.send(message);
解决方法:首先开启qq协议,然后将mail.jar从1.4换成1.5。希望能帮到你